Content - Guide
Create and manage your game's live content [PROF-Content-02]
The purpose of this feature is to allow game maker to store project-specific data objects. In this guide, we will create and publish a content entry, then pull the content from the server within an instance of Unity's MonoBehaviour script.
Adding Content
Game makers may create new content of existing content types or new content of custom content types. For the purposes of this guide, we will be using the existing "Item" type.
| Step | Detail |
|---|---|
| • Unity → Window → Beamable → Open Content Manager |
| 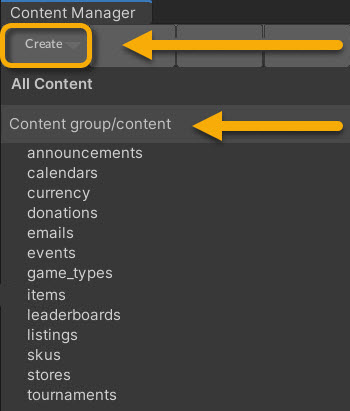 • Select the content type in the list • Select the content type in the list• Press the "Create" button • Populate the content name |
| • Unity → Window → General→ Project |
| • Search by the name given in step #3 • View the asset in the Unity Inspector Window |
|  Note: The icons can be set to any valid Unity’s Note: The icons can be set to any valid Unity’s Addressable object. |
| • Unity → File → Save Project Best Practice: If you are working on a team, commit to version control in this step. |
| • Press the "Publish" button in the Content Manager Window |
Downloading Content
Content that has been published to the server can be pulled from Beamable's ContentService via a ContentLink or ContentRef. Both are shown in this example.
using System;
using Beamable.Common.Content;
using Beamable.Common.Inventory;
using UnityEngine;

namespace Beamable.Examples.Services.ContentService
{
    [Serializable]
    public class ItemLink : ContentLink<ItemContent> {}

    /// <summary>
    /// Demonstrates <see cref="ContentService"/>.
    /// </summary>
    public class ContentServiceExistingExample : MonoBehaviour
    {
        //  Fields  ---------------------------------------
        [SerializeField] private ItemLink _itemLink;
        [SerializeField] private ItemRef _itemRef;

        private ItemContent _itemContentFromLink = null;
        private ItemContent _itemContentFromRef = null;

        //  Unity Methods  --------------------------------
        protected void Start()
        {
            Debug.Log($"Start()");

            SetupBeamable();
        }

        //  Methods  --------------------------------------
        private async void SetupBeamable()
        {
            var beamContext = BeamContext.Default;
            await beamContext.OnReady;

            Debug.Log($"beamContext.PlayerId = {beamContext.PlayerId}");

            await _itemLink.Resolve()
                .Then(content =>
                {
                    _itemContentFromLink = content;
                    Debug.Log($"_itemContentFromLink.Resolve() Success! " +
                              $"Id = {_itemContentFromLink.Id}");
                })
                .Error(ex =>
                {
                    Debug.LogError($"_itemContentFromLink.Resolve() Error!");
                });

            await _itemRef.Resolve()
                .Then(content =>
                {
                    _itemContentFromRef = content;
                    Debug.Log($"_itemContentFromRef.Resolve() Success! " +
                              $"Id = {_itemContentFromRef.Id}");

                }).Error(ex =>
                {
                    Debug.LogError($"_itemContentFromRef.Resolve() Error!");
                });
        }
    }
}
Learning FundamentalsGame makers who are new to Unity and C# can review the fundamentals here.
The above code sample uses C# async methods. However, the same code can be written using the Promise library.• See Beamable: Asynchronous Programming for more info
Inspector
After being added to a GameObject, the Inspector will display a drop-down of all valid content entries.

Output
Click Play in the Editor and inspect the console to see that the Item content was pulled successfully.

Updated 9 months ago