Migrating Unity from 1.19.23 to 2.0.0
This guide outlines the steps for migrating your Unity SDK to the latest version, focusing on microservices and storage components. Please follow the instructions carefully to ensure a smooth transition.
If you have a Unity project using the Beamable 1.x SDK, we strongly recommend you consider upgrading to the 2.0 release. Version 2 brings several massive improvements to the SDK.
- Microservices use our latest "Standalone" model, which means you can leverage many more features than previously possible in version 1.
- Microservices are more performant, uploads are faster, and debugging is way easier than before.
- The Unity Editor uses the Beam CLI behind the scenes, and you can also take advantage of the CLI for your own use cases.
- Beamable Prefabs and Skinning have been replaced with Lightbeam Package samples.
To start the upgrade, update your com.beamable and com.beamable.server packages to 2.0.0. This can be done in the Unity Package Manager, or by modifying the manifest.json file directly.
The update to 2.0 requires a Microservice migration!The new 2.0 SDK treats Microservices as standalone dotnet projects instead of embedded Unity code. The SDK has an automated migration process, but there may be a few manual code edits required.
Microservice Migration
1 - Planning Stage
Before proceeding, create a backup of your Microservices and Storages. You can use Git or any other backup solution that works best for you. Refer to [documentation link] for an overview of the updated Microservices.
During the migration:
- New standalone C# Microservices (C#MS) and Storages will be created.
- Old services will be deleted, but their content will be copied to the newly created services.
Steps in the Planning Stage
- Open the Beam Services window.
- Review the migration plan displayed. This includes:
- A list of all Microservices and Storages to be migrated.
- Detailed steps for the migration process.
- Verify the list:
- Ensure all your services and storages are included.
- If anything is missing, contact our support channels for assistance.
2 - New Services Organization
Previous Folder Structure (Beamable SDK 1.x)
- Microservices:
- Located under
Assets/Beamable/Microservices. - Contain a folder with the same name as the service, a C# script, and an assembly definition with default references.
- Located under
- Storages:
- Located under
Assets/Beamable/StorageObjects
- Located under
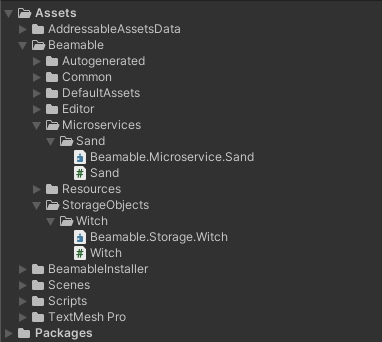
New Folder Structure (Beamable SDK 2.0)
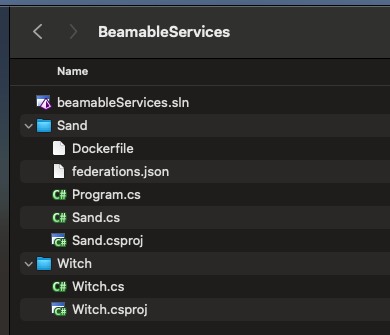
- Microservices and Storages are treated as separate projects inside a different solution then the one Unity is in.
- They are all stored under a hidden folder outside Unity's
Assets/folder, in a new folder namedBeamableServices. - Services can be executed independently using:
- Beamable CLI
- Your preferred IDE
3 - Migration Execution Stage
The migration process is divided into two main parts: Storages and Microservices. Storages must be migrated first in order to resolve dependencies later.
Storage Migration Steps
- Creating the storage: New storages are created with the same names as the old ones.
- Copying the code:
- Old code is transferred to the new storage location.
- Additional files in the old storage folder are also copied.
- Adding references: References from the old storage are checked and added to the new storage. This step first runs through all assembly definition references in the storage
asmdefand check if those are valid assemblies, if so, they are added to that storage as a separate project. - Removing old code:
- Old files are deleted if previous steps were successful.
- If errors occur, deletion is skipped to preserve data.
Microservice Migration Steps
Microservices follow the same steps as storages with an additional step:
- Federated Implementations: Update code for federated services manually. Changes include:
- Replace
IThirdPartyIdentitywithIFederationId. - Remove the
UniqueNameproperty and use[FederationId("old unique name here")]instead. - Replace
.UniqueNameaccesses through out the project with.GetUniqueName().
- Replace
4 - Final Steps
After completing the migration:
- Test your services and storages: Run all services to ensure they function as expected.
- If issues arise, consult the error guide below.
Error Troubleshooting
Common Issues and Solutions
- Duplicate Assembly References
- Error: "There are duplicates of an assembly reference in the list."
- Solution: Open the Config tab in
Beam Servicesand remove duplicate entries from theAssembly Definitionslist.
- Reappearance of the migration window
- Cause: Incomplete file creation during Unity's domain reload or an error during the migration of one or more of the services.
- Solution: Clicking on
Migrate Servicesagain should fix it in the most cases.
- Non-functional Microservice
- Check the
.csprojfile for missing assembly references. - Ensure Docker is running if the service requires a storage dependency.
- Check the
UniqueNameProperty Not Found- Replace all occurrences of
UniqueNamewithGetUniqueName()
- Replace all occurrences of
- Firewall Permissions on Windows
- During the installation, your OS may prompt a pop-up for asking for firewall access.
- Grant permission to avoid functionality issues.
- Types aren't working in the IDE
Its possible in some cases where the BeamableServices solution won't recognize any of the Beamable types. To fix this, use the IDE to unload and reload the entire solution.
This documentation provides a comprehensive guide to migrating your UnitySDK. For further assistance, feel free to contact our support team.
Welcome to the New Beamable
The 2.0 release looks a little different that the 1.0 era. At a very high level, the Toolbox has been removed. Instead of using the Toolbox to navigate the Beamable windows, use the Beamable Button at the top-right of the editor.
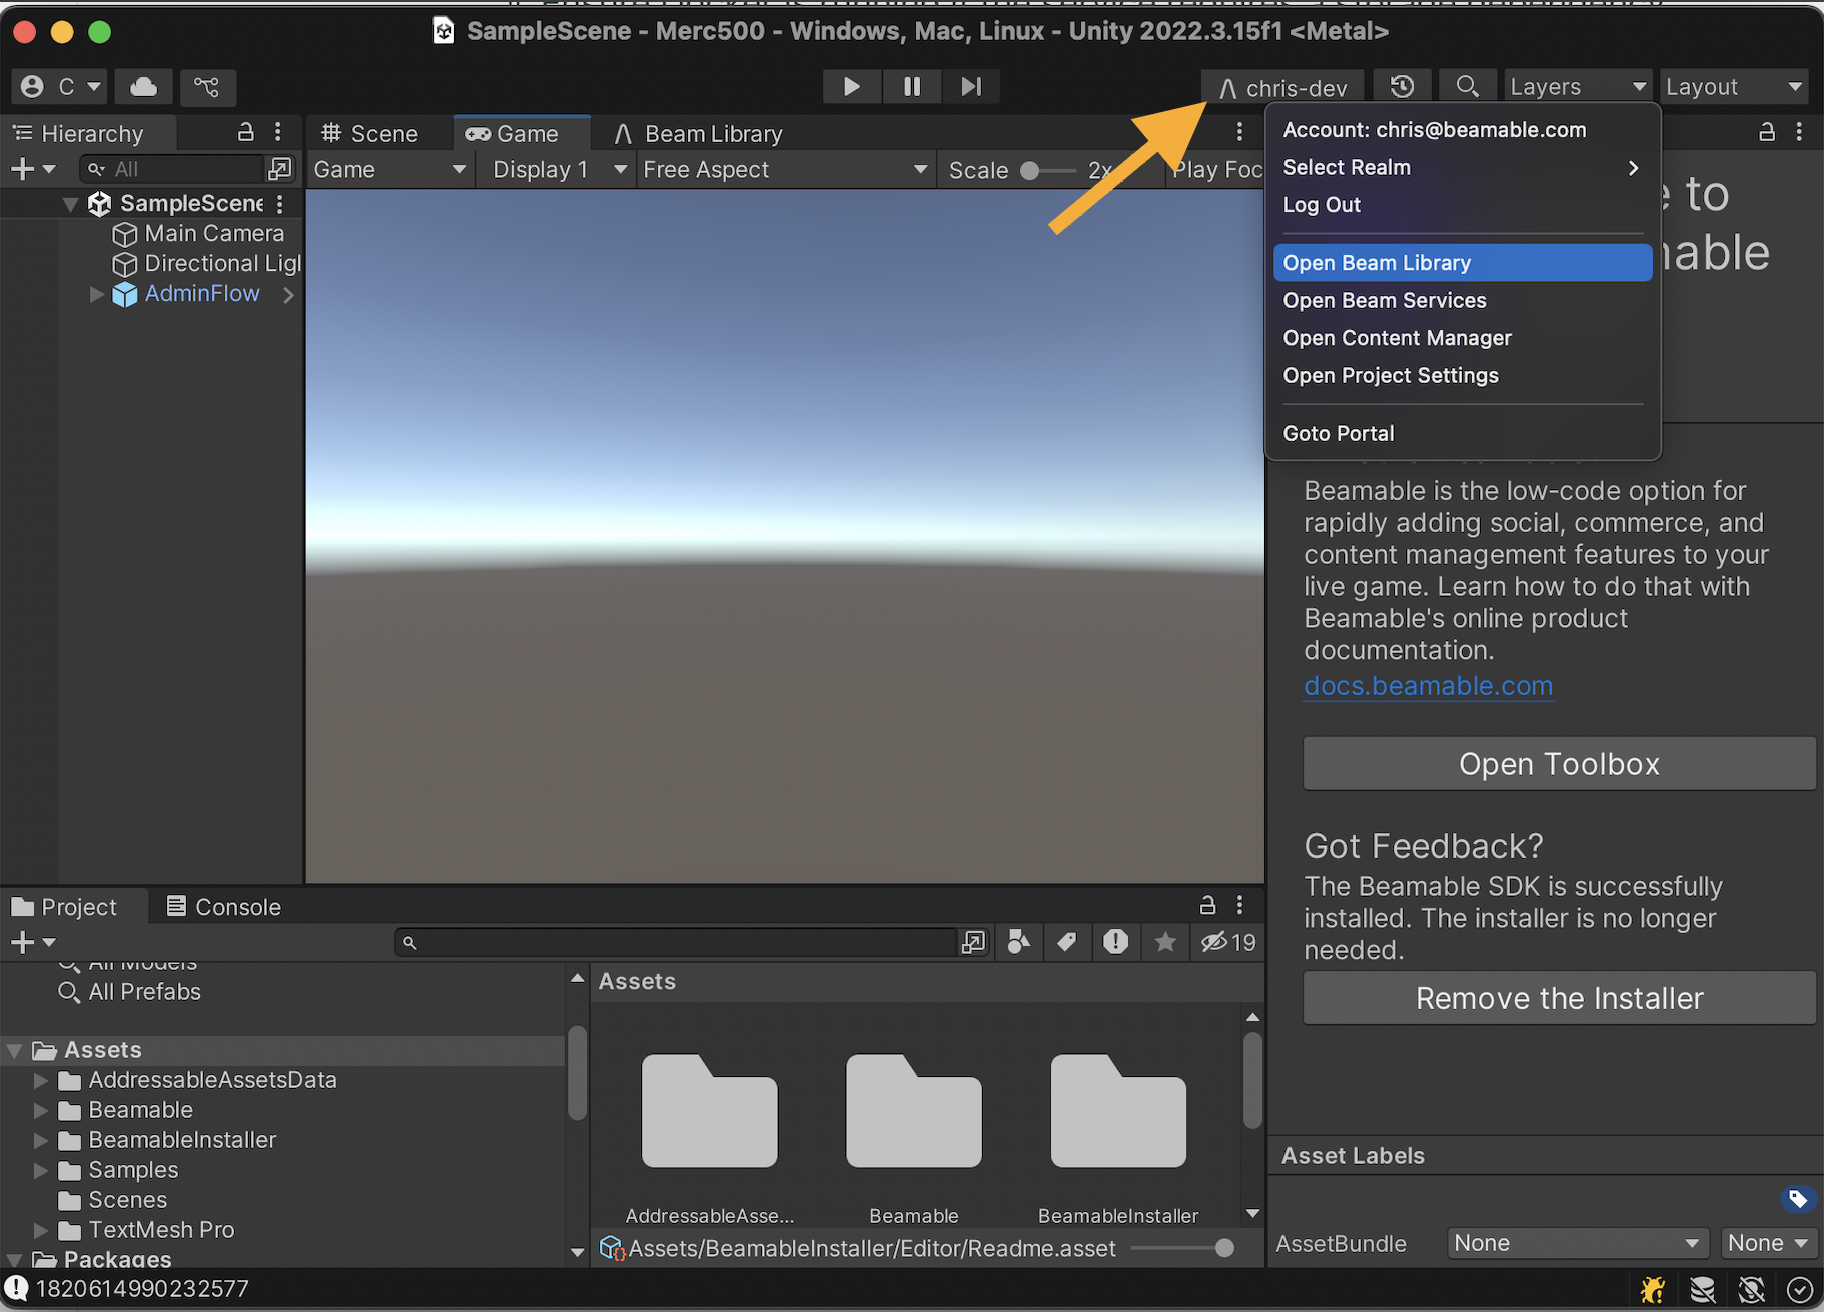
The Beamable Button is at the top-right of the editor.
Goodbye Prefabs
The Toolbox has been removed, and so have access to the old Beamable prefabs. If you were using those prefabs, they still exist, but are not easily accessible. Your existing scenes should not break, because the Beamable SDK still includes the prefabs. However, the prefabs will be completely removed in a future version of Beamable. The removal will happen in a phased approach. First, the prefabs themselves will be deleted, and in a later release, the scripts will be removed. We recommend that you migrate away from using these prefabs, or Unpack the prefabs, and copy and renamespace the scripts.
With the removal of the prefabs, our skinning and theming systems have also been removed in the 2.0 release. Similarly, the old skinning scripts still exist in the SDK, but they are no longer accessible for new use cases. We recommend you migrate away from these scripts if you're using them.
Hello Lightbeams
Instead of prefabs, the new window, Beam Library shows a collection of Package Samples that are copied into your Assets folder. You have complete control over these samples, and they are versioned with the SDK. Learn more about lightbeams, LightBeam Overview.
Standalone Microservices
The Microservice Manager has been renamed to Beam Services. The window looks similar to the old Microservice Manager, but different in a few critical ways. The most important change is that only 1 service is focused at any given time. To view the logs from another service, use the service picker dropdown.
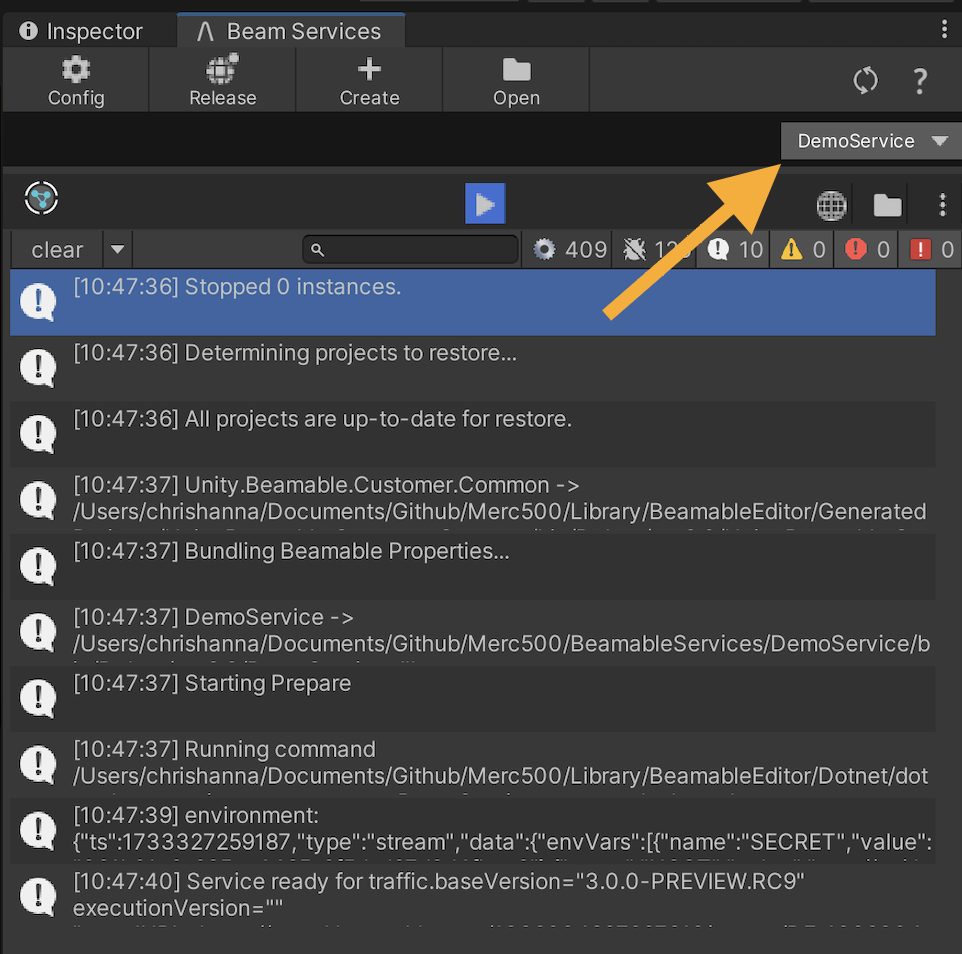
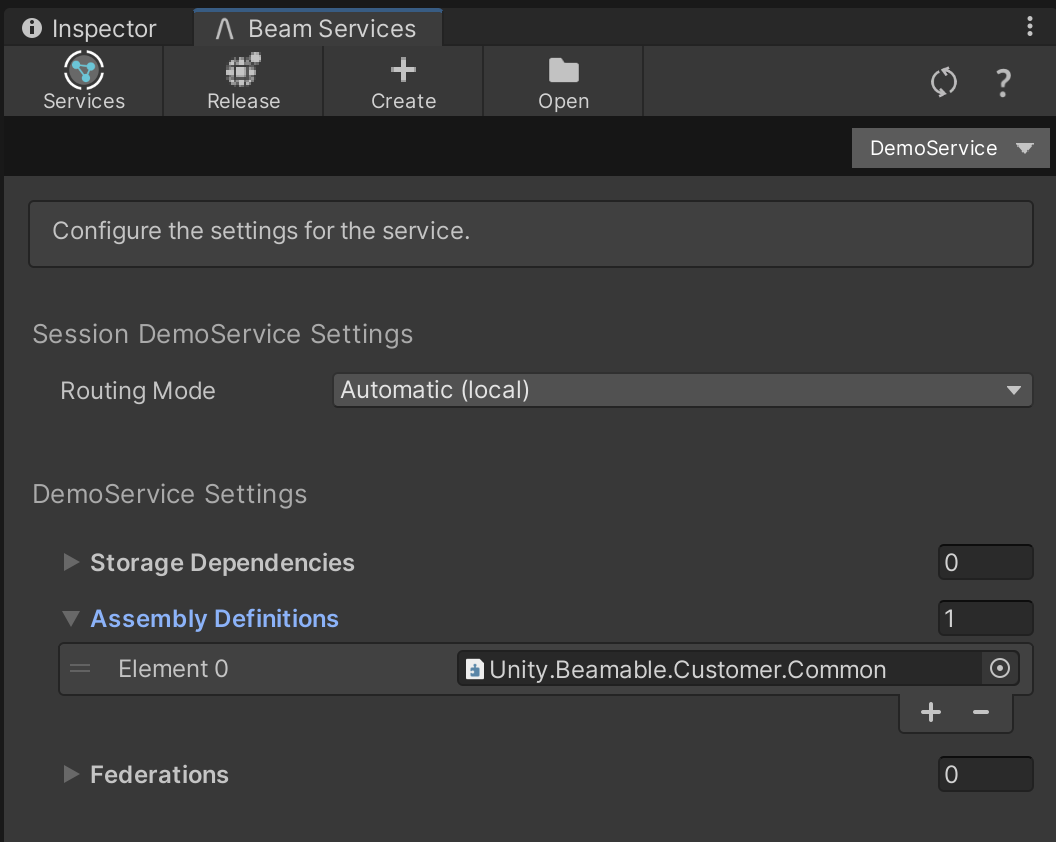
Services are no longer stored in the Unity's Assets folder. Instead, they are located in a sibling folder, BeamableServices. The services are not Unity assets, and there is no Assembly Definition representing the service any longer. Previously, the Assembly Definition asset was critical for adding references to other code or Microstorages. In the 2.0 release, those settings are configured in the Beam Services window via the Config mode. Select the "Config" button for a selected service to see the available settings.
Routing
Previously, when you started your Unity game in Playmode, any requests to a Beamable Microservice would go to your locally running service if it was running. If the service was not running locally, the traffic would be sent to the remote published service. This is now configurable in the Config section of the Beam Services window. By default, the same behaviour is the same, except you can start your Microservice after you enter Playmode.
The Routing Mode setting allows you to configure how the routing should happen.
Federation
Previously, implementing a Federation on a Microservice only required that you added an interface to the Microservice class signature. In the 2.0 release, you must also specify the federation in the Config section of the Beam Services window.
Additionally, the IThirdPartyCloudIdentity type has been replaced with the IFederationId interface. Those interfaces require a new attribute, [FederationId]that takes a single string parameter representing the unique name.
Updated 3 months ago
