Building a Battle Pass
A battle pass is a common engagement feature for players. You can implement a Battle Pass for your game by utilizing Beamable's Custom Content capabilities. This is a quick guide for how to think about using Beamable for this feature.
First, define a custom content type for the Battlepass by creating a class that inherits from ContentObject. Each Battlepass will have tiers, and each tier can have rewards.
[ContentType("battlepass")]
public class Battlepass : ContentObject
{
    public string Name;
    public string EndDate;
    public List<Tier> Tiers;
}

[Serializable]
public class Tier
{
    public int Level;
    public List<Reward> Rewards;
}

[Serializable]
public class Reward
{
    public string RewardName;
    public int Quantity;
}
Once the custom type is defined, follow these steps to add a Battlepass content object in the Beamable Content Manager:
Step 1: Open the Content Manager:
- Unity → Window → Beamable → Open Content Manager
Step 2: Create a new content object of type Battlepass:
- Select "Battlepass" from the content type list.
- Press the "Create" button.
- Provide a name for the Battlepass content.
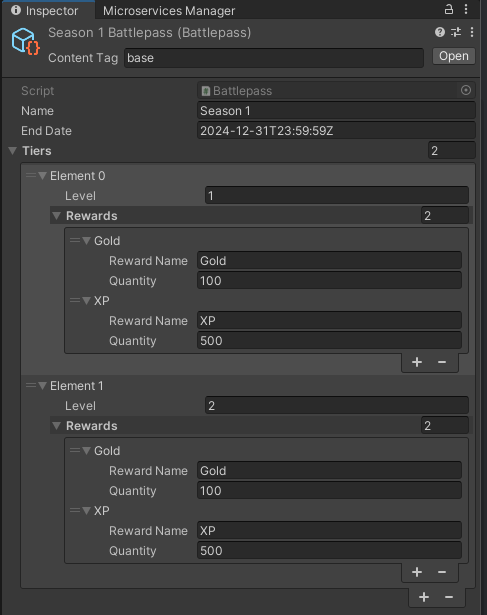
Step 3: Populate the fields in the Unity Inspector:
- Name the Battlepass
- Define the tiers and rewards (Example in screenshot)
- Set the EndDate using the ISO 8601 format (e.g., 2024-12-31T23:59:59Z).

Step 4: Save the Project:
- Go to Unity → File → Save Project.
Step 5: Publish the content:
- Once the Battlepass is configured, press the Publish button in the Content Manager to push the Battlepass content live.
Fetching and Using the Battle Pass at Runtime
After the Battlepass is defined and published, use Beamable’s features to fetch and use the content at runtime. In this example, we'll retrieve the Battlepass.
```
    await _battlepassRef.Resolve()
        .Then(content =>
        {
            _battlepass = content;
            Debug.Log($"Fetched Battlepass: {_battlepass.Name}");
            DisplayBattlepassDetails();
        })
        .Error(ex =>
        {
            Debug.LogError("Failed to fetch the Battlepass content.");
        });
```
Adding the Battlepass to Player Inventory
You can add the Battlepass to a player's inventory using Beamable's Inventory system. Here's how you can use the Inventory.Update method to store the Battlepass details, such as its name and end date.
To access items.battlepass, an item named battlepass should be created and published through the Content Manager.
private async Task AddBattlepassToInventory()
{
    _beamContext = await BeamContext.Default.Instance;
    var inventory = _beamContext.Inventory;

  // Add Battlepass to the player's inventory
  await inventory.Update(builder => builder.AddItem("items.battlepass", new Dictionary<string, string>
  {
      { "name", _battlepass.Name },
      { "endDate", _battlepass.EndDate }  // Add additional properties for the battle pass
  }));

  Debug.Log("Battlepass added to inventory!");
}
Handling End Date and Expiration Validation in a Microservice
You can use Beamable’s microservices to validate the Battlepass expiration. Since Battlepass is a custom ContentObject, the type won't be findable by default in microservices. You must define an assembly reference to inform the microservice about the custom content object.
Microservice method:
       [ClientCallable]
        public async Task<bool> IsBattlepassValid(ContentRef<Battlepass> battlepass)
        {
            var battlePass = await Services.Content.GetContent(battlepass);
            if (battlePass == null)
            {
                throw new Exception($"BattlePass with ID {battlepass.GetId()} not found");
            }

            var currentTime = DateTimeOffset.UtcNow.ToUnixTimeSeconds();
            if (DateTimeOffset.TryParseExact(battlePass.EndDate, "yyyy-MM-ddTHH:mm:ssZ",
                    CultureInfo.InvariantCulture, DateTimeStyles.AssumeUniversal, out var endDate))
            {
                long endDateUnix = endDate.ToUnixTimeSeconds();
                return currentTime <= endDateUnix;
            }
            else
            {
                throw new Exception("EndDate is not in a valid ISO 8601 format.");
            }
        }
Download the code now!
All the code can be found in a Beamable Battle Pass Example Git Repo
Updated 4 months ago
