Installing Beamable (Unreal)
For full instructions on how to install the Beamable Unreal SDK, please see the readme for the GitHub project.
Download Unreal SDK
Beamable Unreal SDK Repo
The source code repo includes a README.md file that contains information on:
- Setting up Beamable for your project
- Using Sign-In and setting up the RunTimeSubsystem
- Explanation of Core Modules
- Explanation of Core Blueprint Nodes
- How to use Stand alone C#Microservices with Unreal
Required Realm Config
Getting Started
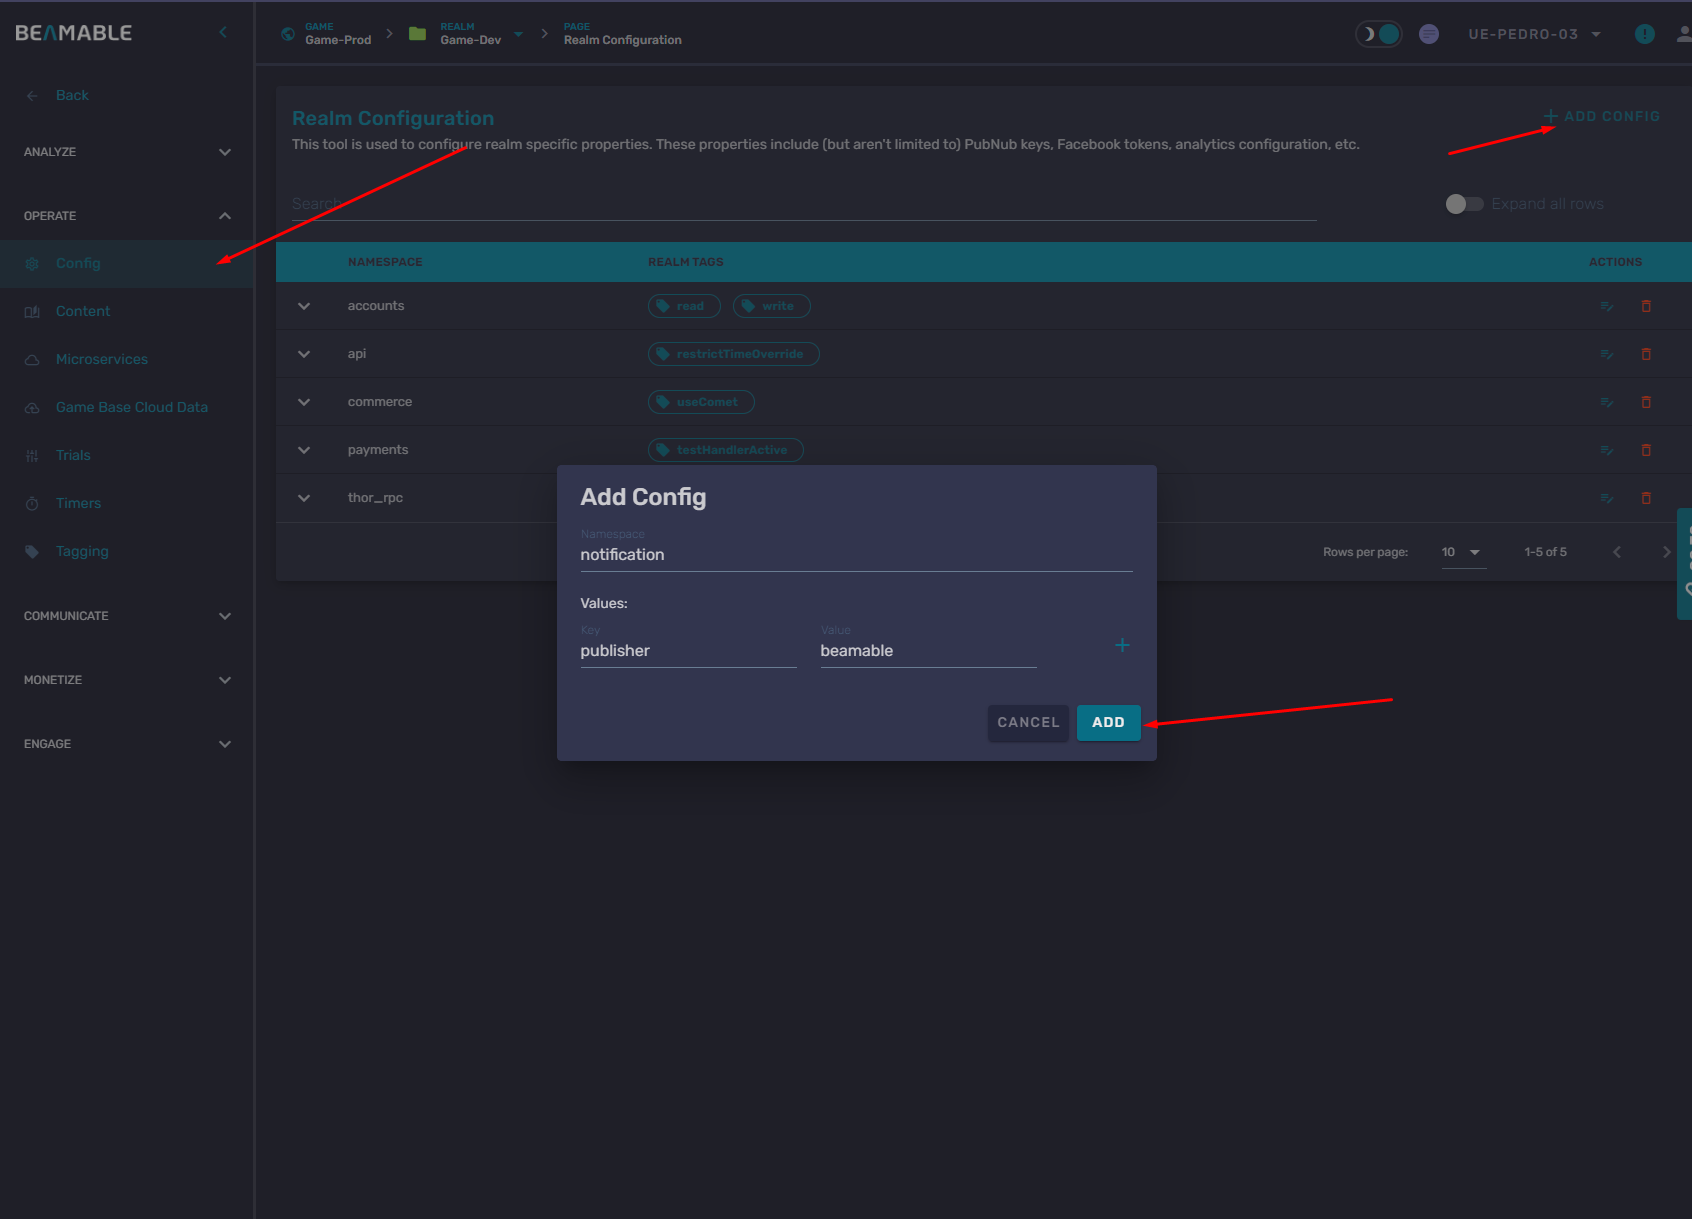
Signing Up and Realm Configuration
Before you can start using Beamable in your project, you should sign-up in our portal. After you've done this, you need to configure each of your realms to use the notification pipeline the Unreal SDK supports. Simply go into each of your realms in the portal and apply the following realm config:
Namespace:
notification
Key:publisher
Value:beamable
Now that you have an Organization and Game created with Beamable, you can add the Beamable SDK plugin to your project.
Setting up the Beamable SDK in your Project
Start by cloning this repo's main branch. At the moment, we are in early development of the SDK --- so the simplest way to get new features, fixes and changes to our early adopters is to simply have them getting things directly from this release branch.
While its cloning, here are a couple of things to note about our current stage of development:
- We are not tracking release numbers so we recommend tracking the commit hash by-hand or setting up your own remote repo and leveraging git tags there to keep track of which version you are in.
- At the moment, we also do not provide any API backward compatibility guarantees. While we avoid making unnecessary changes, if there incremental gains to be had at this point in time by changing it, we will make them.
Once this repo is cloned/pulled locally, simply copy/paste the folderPlugins/BeamableCoreinto your own project'sPluginsfolder. After that, you'll need to add some modules to yourTarget.csfiles.
// Add to YourGameGame.Target.cs
ExtraModuleNames.AddRange(new string[] { "BeamableCore", "BeamableCoreRuntime", "BeamableCoreBlueprintNodes" });
// If you have an Editor Module, add this to YourGameEditor.Target.cs
ExtraModuleNames.AddRange(new string[] { "BeamableCore", "BeamableCoreEditor", "BeamableCoreBlueprintNodes" });
// If you're game has a dedicated server build, add this to YourGameServer.Target.cs
ExtraModuleNames.AddRange(new string[] { "BeamableCore", "BeamableCoreRuntime", });
// If you're game has a client-only build, add this to YourGameClient.Target.cs
ExtraModuleNames.AddRange(new string[] { "BeamableCore", "BeamableCoreRuntime", });
To use Beamable, you'll also need to add the modules to your Build.cs files for the targets and modules using Beamable.
// Add to YourGame.Build.cs
PublicDependencyModuleNames.AddRange(
new string[] {
// ... Other Modules ...
"BeamableCore",
"BeamableCoreRuntime",
}
);
// Add to YourGameEditor.Build.cs
PrivateDependencyModuleNames.AddRange(
new string[] {
// ... Other modules ...
"BeamableCore",
"BeamableCoreEditor",
"BeamableCoreBlueprintNodes",
}
);
Now you can compile and run the Development Editor target for your project from VS, Rider or any UE-supported IDE.
The Beamable Window and Making your First Request
Once you compile and run your UE Editor, you should see the Beamable Logo in your upper-right bar, next to the Settings dropdown. This button opens the Beamable window.
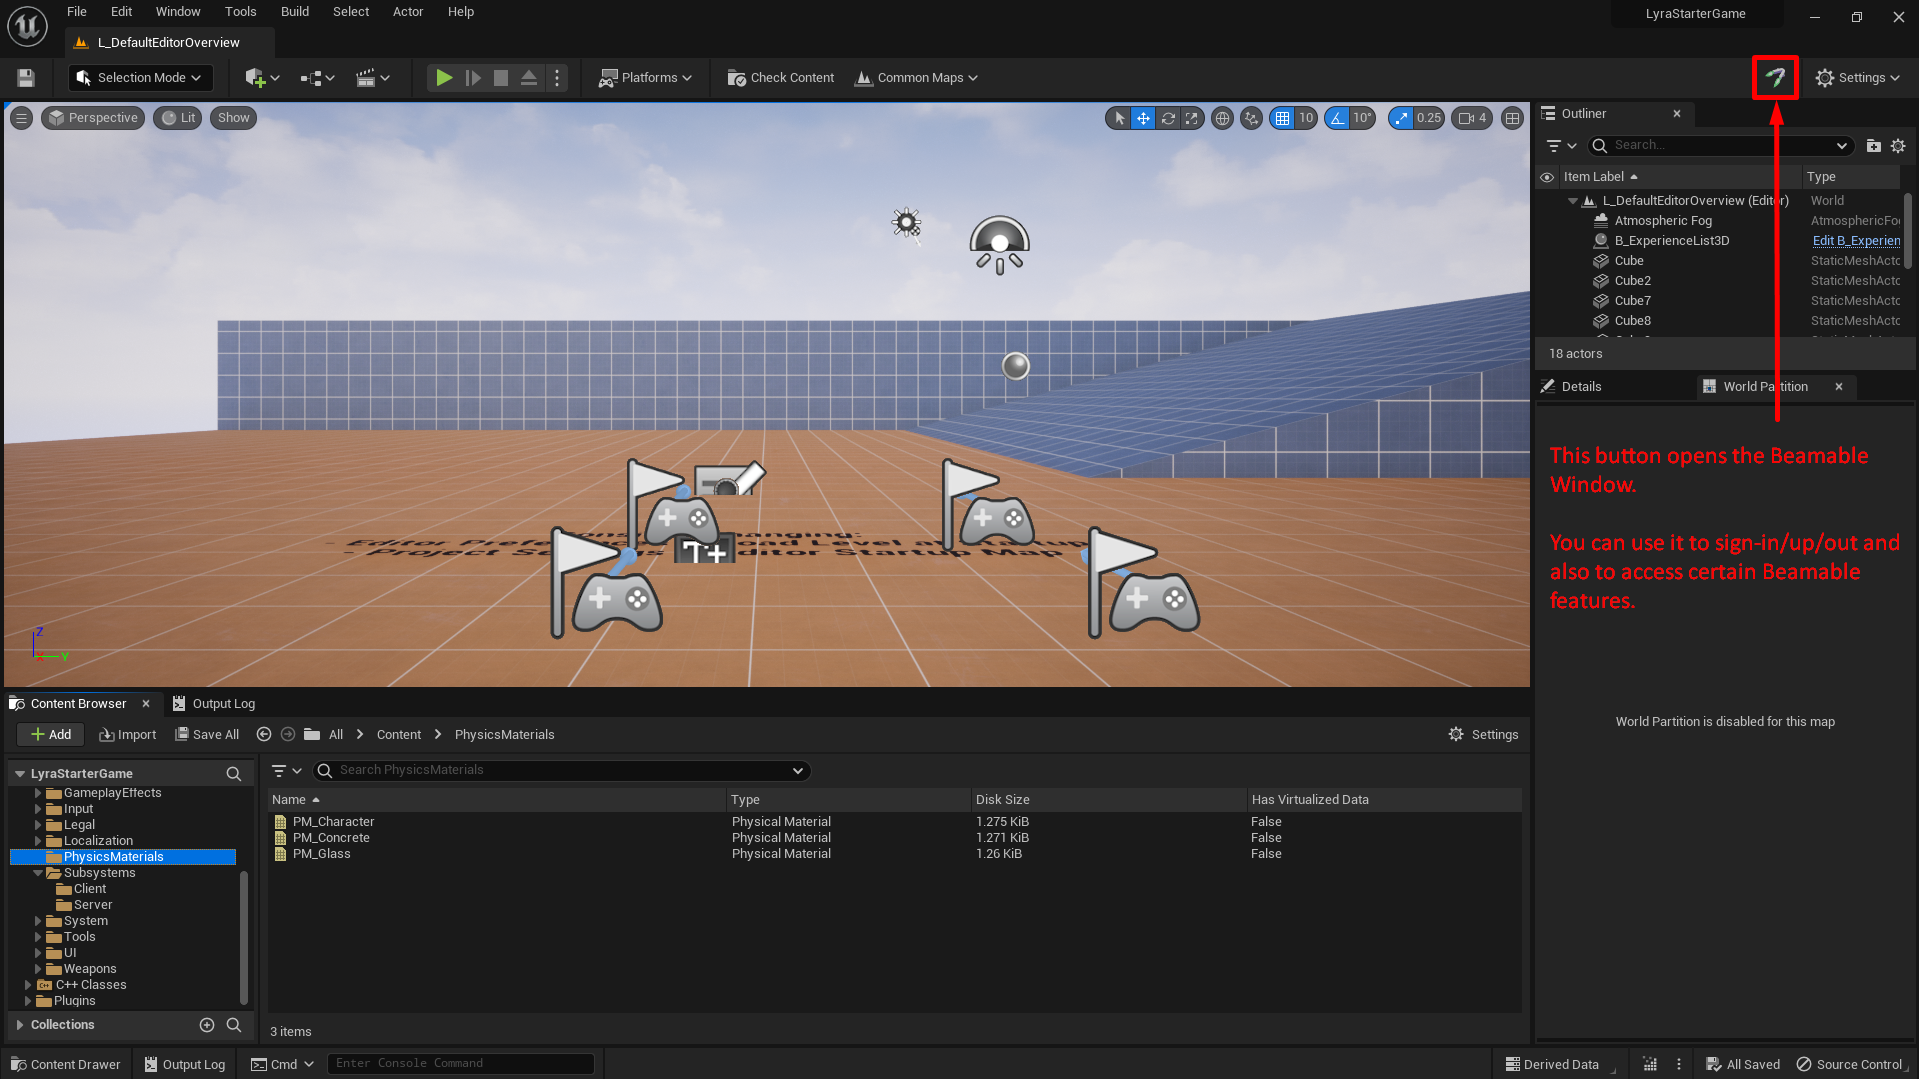
Once you have the Beamable opened, you can login to your brand new account you just created in the Beamable portal. When you do, you should see the window below:
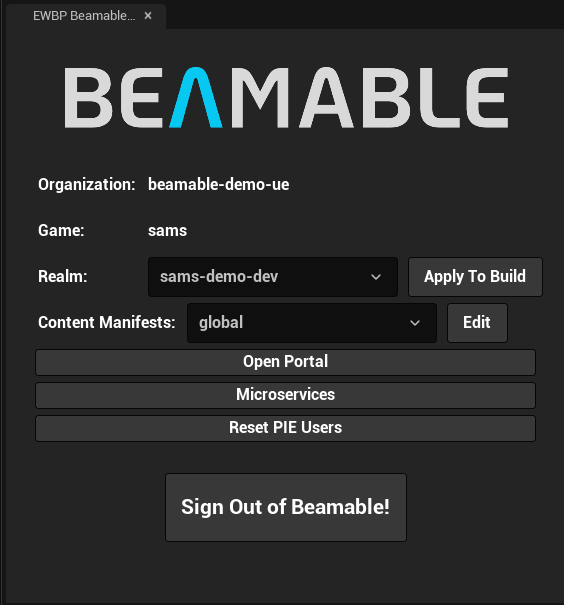
Once you login in the editor, there's a few things to note:
-
Realmshows which realm you are in.- The
ApplyToBuildbutton will set the realm information in theConfig/DefaultEngine.inifile of your project. Whatever realm is configured in this file, is the realm your build will be pointed towards. - When you get started, don't forget to use the dropdown to change over to your game's dev realm. At the moment, the first sign in points you at your production realm instead.
- The
-
Content Manifests, most of the time, only hasglobalas at the moment we don't support multiple manifests in UE. See the [[Unreal SDK - Content]] for more info on how to use this. -
Open Portalopens the Beamable Portal in your default web-browser already logged in with your editor user and pointed at your current realm. -
Microservicesopens the Beamable Microservice Window. See [[Unreal SDK - Microservices]] for more info on how to get started with microservices. -
Reset PIE Users(Play-In-Editor) removes your PIE users locally cached data.
- By default, when you sign into a Beamable account in PIE (in your game code), Beamable will use the same user until you delete the filesSaved/Beamable/UserSlots/PIE_XXXXX.json. This button does that for you. After you click it, the next time you enter PIE, a brand new Beamable player account will be created.
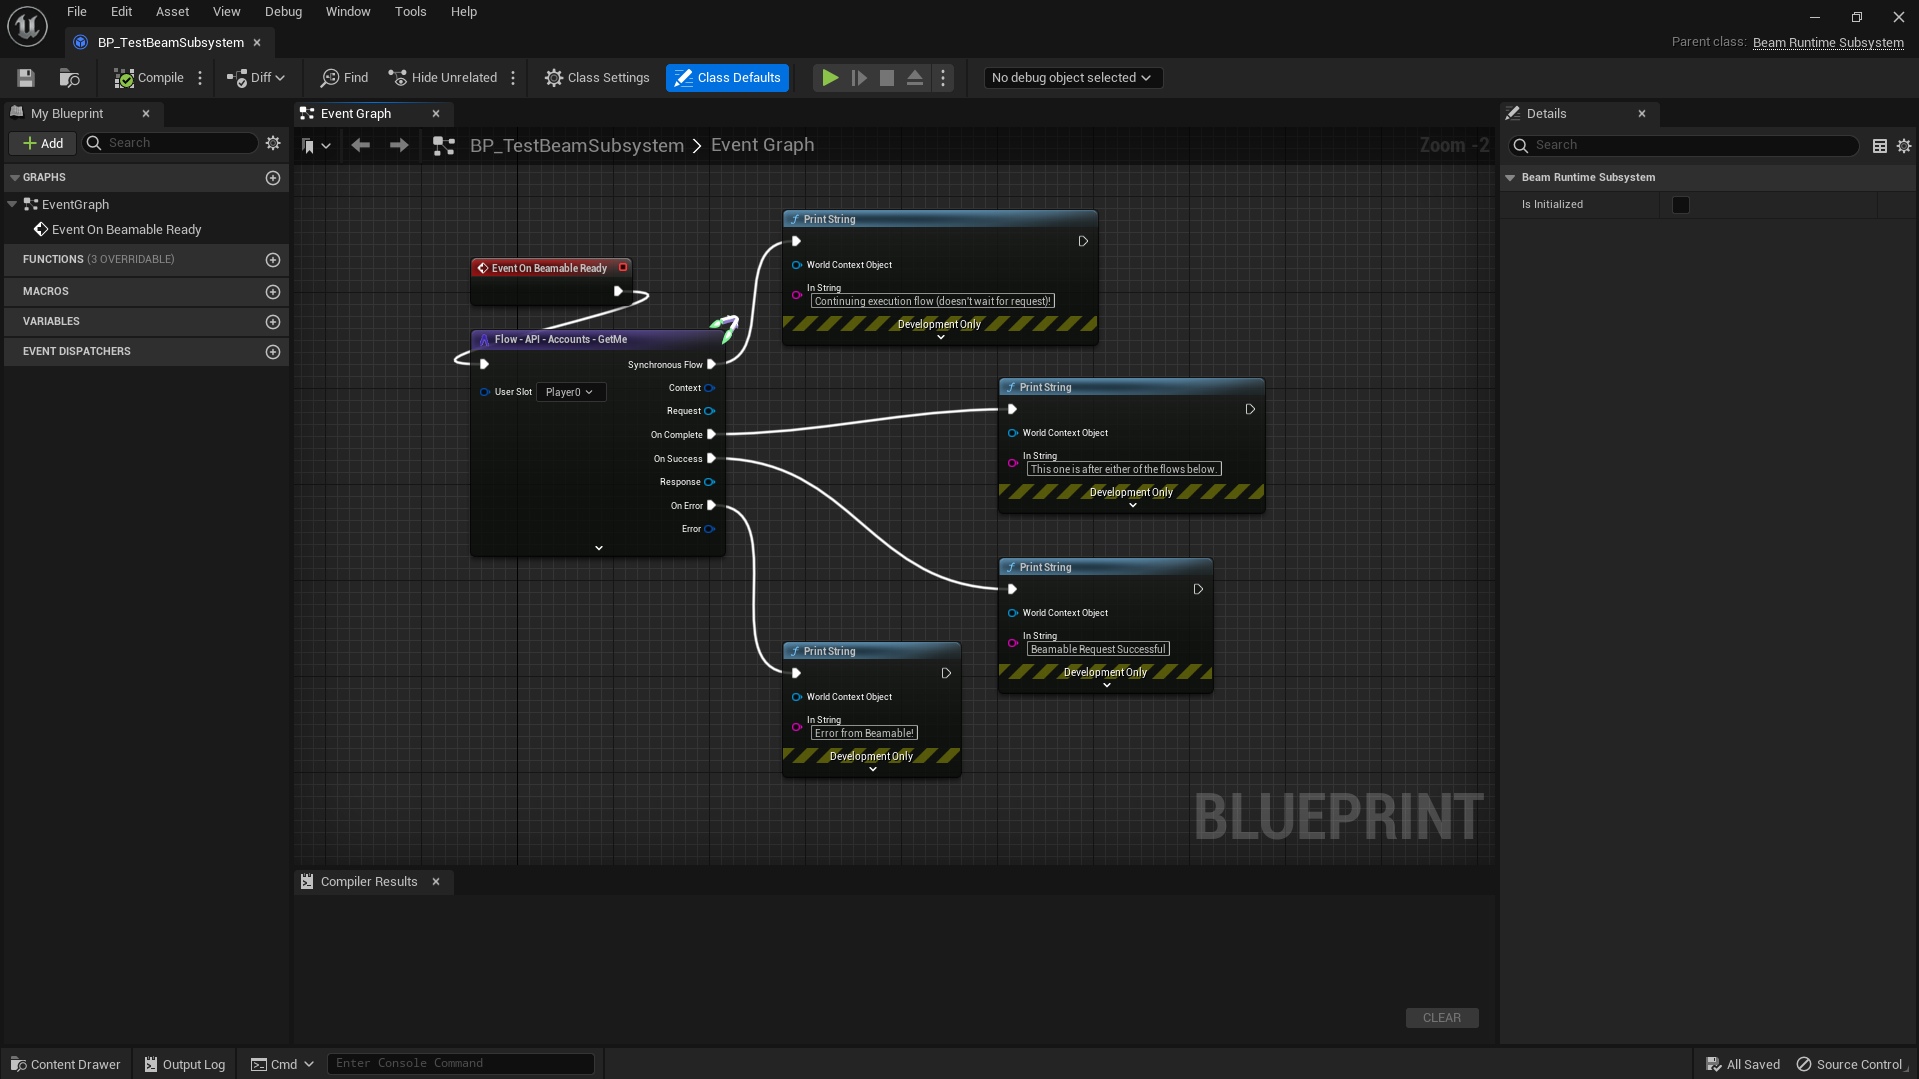
Now that you are familiar with the Beamable Window, you are ready to make your first Beamable request (we'll do it via Blueprint, but you can do the exact same flow by making these calls in your Project'sGameModeclass'sBeginPlayfunction).
To get started, open your Level Blueprint and add the following pattern:
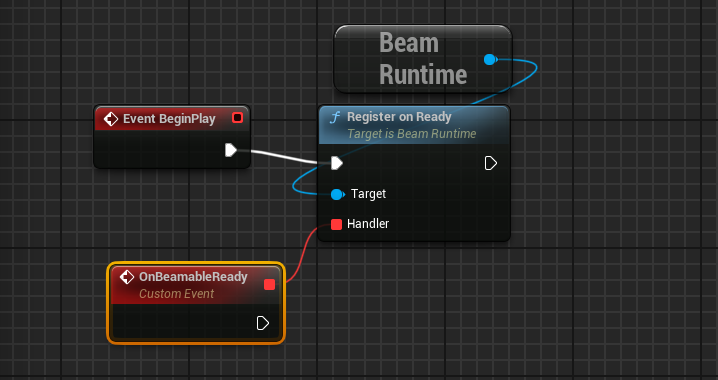
TheBeamRuntimeis anEngineSubsystemthat is responsible for controlling the SDK's lifecycle and, in clients, player authentication.
[[Unreal SDK - Runtime Concepts]] explains how the Beamable Runtime works. Please read it after you are done with this guide and before before deciding how to integrate Beamable with your project as the default Beamable configuration might not be the best fit for your type of game.
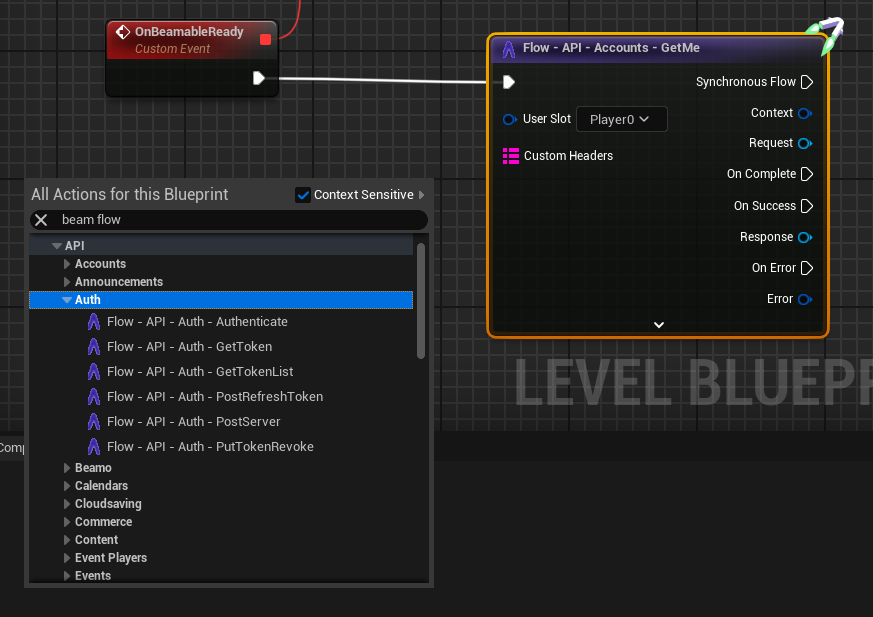
Now that you have this event hooked up, you can add your first Beamable node. These nodes are nice custom nodes that wrap around the following functionality:
-
Creating a new Request
UObject. -
Getting a specific Bemable Api Subsystem (a stateless subsystem that exposes functions to talk to the Beamable Backend)
-
A set of hidden Custom Event nodes (for success, error and completion) of the WebRequest being made through the Beamable SDK.
- Because of this, Unreal does not allow the use of these nodes (or any node that expands to Event nodes) outside of EventGraphs or Macros used in EventGraphs.
With the SDKs default configuration and the above setup, you can enter PIE (Play-In-Editor). You should see several requests's responses being written to your Output Log window. After you see the finalGetMerequest, you can exit PIE.
Before we complete this guide, there's one final thing that is important to know. You can, and should, uselog LogBeamBackend Verbose(and other Log categories found inBeambleCore/BeamLogging.hfile). Keep in mind that this verbose logging will print out everything about the request being made and response coming in. Its meant to aid us in diagnosing issues that you may encounter when using the SDK AND not for production use. To turn it off in the same editor session, just runlog LogBeamBackend Display.
Now that you've made your first Beamable Request, take a look at the [[Unreal SDK - Runtime Concepts]] page so you understand more about how the SDK is structured and the various paths to using it and the best path for your game.
For questions, we suggest joining our discord channel at https://discord.gg/beamable and contacting your Beamable account or support rep if you have a PRO Support plan.
Updated 7 months ago