Game Content Designer
Allow game makers to create and manage data structures
This Beamable functionality is currently in-development and subject to change. Game makers are invited and encouraged to try it out, send feedback, and help shape the future of the product.
Preview ReleaseQuestions? Comments? Contact us.
Overview
This guide includes everything needed to use the Game Content Designer feature which allows game makers to create and manage data structures without having to write code.
Live games often have frequent changes to their structured and unstructured data: the definition of items and merchandise, virtual goods, currencies, inventory, items, world data and stories are just a few examples.
Managing these data structures is usually a pain, requiring special forms or processes or direct-editing of source code files that contain data definitions.
Game makers know that these problems only get worse when the game goes game live -- because the desire is to change this data on the fly, without interfering with update, deployment, or live operations -- or requiring engineering intervention. That's why we created the Game Content Designer (GCD). This Google Sheets Add-On allows game makers to manage all of the game's live data with the simplicity of a Google Sheet.
What is the GCD?
With Game Content Designer, game makers can create where they are most comfortable and then export the results. With no extra work, they can publish directly to their game with GCD handling all the translation from flat spreadsheets to Beamable Content, ultimately used by Unity in the form of ScriptableObjects. With many common Content-Type's already provided by Beamable, a game maker can create and publish content without touching code.
Benefits
- Supports import/export via the industry standard Json format
- Utilizes the powerful, versionable, and free-to-use Google Sheets for data creation, management, and collaboration
This feature does not require a Beamable license nor the Beamable SDK. It is a free tool for use by the community. It is created and maintained by Beamable.
Beamable Not Required
Workflows
Even though GCD is made to work with Beamable, game makers do not have to use the Beamable back-end. GCD converts flat spreadsheet into Json objects with complex structures (arrays, references between objects, multidimensional objects), validation, constraints (min/max), crosstab IDs, etc... that can be load directly into a game via Unity.

The "GCD" Google Sheets Add-On
Exports
Schema headers are initially defined in the first row of a GCD sheet. For complex data structures that include nested data, the headers will span across multiple rows to represent the data hierarchy. The schema headers provide the mapping information for exporting data from a spreadsheet.
- Json - A lightweight format for storing and transporting data. This is the primary export option. See Json.org's Json Overview for more info
- Yaml - A human-readable data-serialization language. This is a secondary export option. See Wikipedia's Yaml Overview for more info
Game Maker User Experience
During development, the game maker's user experience is as follows:
Steps
Follow these steps to get started:
Step 1. Create the Sheet
Google Sheets is a web-based spreadsheet app. Here data is arranged in the rows and columns in a grid and can be manipulated and used for modeling calculations.
It's free, powerful, and a preferred tool of many game designers.
Step | Detail |
|---|---|
| • Visit Google Accounts to login |
| • Visit Google Sheet to create a new file |
Step 2. Install GCD
GCD must be installed in the game maker's active Google account to added to a new Google Sheet.
For existing Google Sheet with GCD already installed, the following step may be skipped.
Step | Detail |
|---|---|
| • Open Game Content Designer (GCD) on the Google Workspace Marketplace |
| Note: GCD supports both |
| • E.g. The file created in "Step 1. Create the Sheet" above |
|
|
Step 3. Manage the Data
Step | Detail |
|---|---|
| • Add cells Note: Google Sheets support styling of fonts and colors to aid readability, validation to correct newly inputted values, formulas for math operations (e.g. add cells, average cells, etc...), and more... |
| Note: Google Sheets save automatically. The format is versioned, backed-up, and easily shared for collaboration |
Adding Data
Schema Headers make up the first row of a GCD sheet.
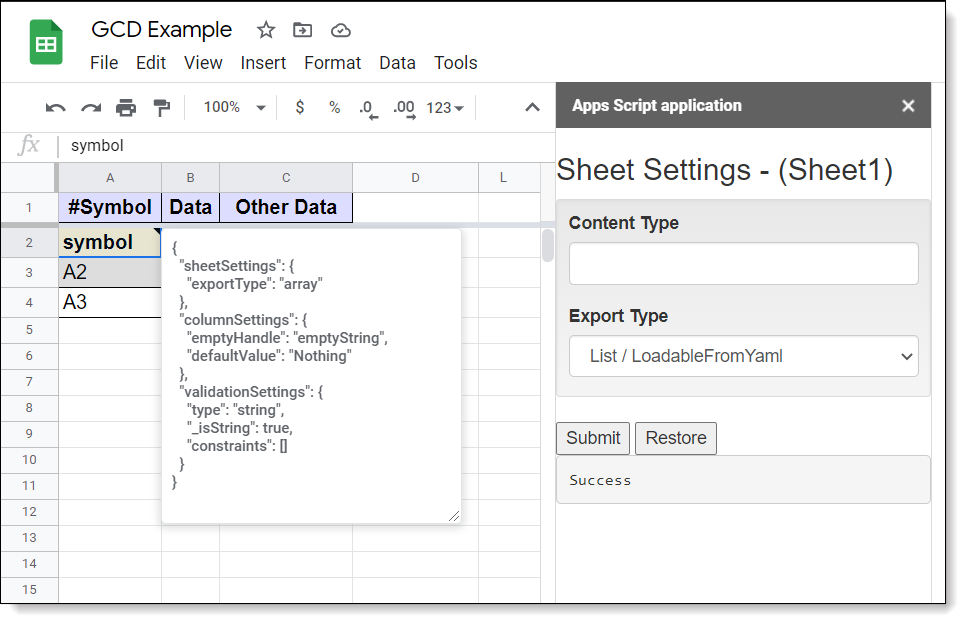
The metadata, stored in the Notes of the Schema Headers, provides additional information, such as specific export behavior for that column, as well as validation settings. The first column's schema header also stores sheet settings as part of the metadata.
Storing this information in the sheet itself means that copying a Spreadsheet, or even just the sheet cells, brings all the export, validation, and view information along with it.
Data Formatting
- Column - Each column represents a different field in the data structure. (Breadth of Data)
- Row - Each row represents another entry in the array. (Depth of Data)
Examples
For all of these examples, we assume that the export type is set as List. This represents the typical common setup.
1. Basic Object
| Input | Output | ||||||||||||||||
|---|---|---|---|---|---|---|---|---|---|---|---|---|---|---|---|---|---|
|
{
  "__README": "Readme here ... ",
  "BasicObject": [
    {
      "symbol": "A2",
      "data": "B2",
      "other_data": "C2"
    },
    {
      "symbol": "A3",
      "data": "B3",
      "other_data": "C3"
    }
  ]
}
|
2. Basic Object With Comment
To write a comment, or have an empty row for whatever reason, just add a '#' to the start of the row. This will tell the exporter to act like the row doesn't even exist.
| Input | Output | ||||||||||||||||||||
|---|---|---|---|---|---|---|---|---|---|---|---|---|---|---|---|---|---|---|---|---|---|
|
{
  "__README": "Readme text ... ",
  "BasicObjectWithComment": [
    {
      "symbol": "A2",
      "data": "B2",
      "other_data": "C2"
    },
    {
      "symbol": "A4",
      "data": "B4",
      "other_data": "C4"
    }
  ]
}
|
3. Complex Object
Adding a dot '.' to a path, creates a more complex object. Multiple columns can map to the same object with for different fields.
These can be as deep as needed.
| Input | Output | ||||||||||||||||||||||||||||||||
|---|---|---|---|---|---|---|---|---|---|---|---|---|---|---|---|---|---|---|---|---|---|---|---|---|---|---|---|---|---|---|---|---|---|
|
{
  "__README": "Readme text ...",
  "ComplexObject": [
    {
      "symbol": "A2",
      "data": "B2",
      "object": {
        "one": "C2",
        "two": "D2"
      },
      "deep": {
        "foo": "E2",
        "child": {
          "bar": "F2",
          "delta": "G2"
        }
      }
    },
    {
      "symbol": "A3",
      "data": "B3",
      "object": {
        "one": "C3",
        "two": "D3"
      },
      "deep": {
        "foo": "E3",
        "child": {
          "bar": "F3",
          "delta": "G3"
        }
      }
    },
    {
      "symbol": " ",
      "data": "",
      "object": {
        "one": "",
        "two": ""
      },
      "deep": {
        "foo": "",
        "child": {
          "bar": "",
          "delta": ""
        }
      }
    }
  ]
}
|
Here are hints to help explain some of the trickier concepts:
Gotchas• Avoid naming any cell as _locale. That is a reserved keyword for GCD
More Data Formatting Options
GCD supports even more!
- 4 . Arrays - Use a square brackets ([ ]) token to support a column as being an array
- 5 . Nested Arrays - To support arrays within arrays
- 6 . Vertical Object Representation - To support key/value pairs like in configuration systems
- 7 . Horizontal Array Representation - To support a small list or to have each entry to be a single row for easier manipulation
- 8 . Layers of Data - Use an underscore (_) token to support storing multiple layers of data that are _separately _exported.
- 9 . Hierarchy of Multiple Sheets - To support referencing the exported data of one sheet as the value for a cell in another sheet
- 10 . Exclusion of Data - To exclude data from the export, use an exclamation point (!) in the header name.
These formatting options allow for building complex data in a more sane format.
Example File
All examples (1-9) are available in in the following Google Sheets example file.
Source | Detail |
|---|---|
 |
Note: It is not recommended to use this file as-is directly in a production project. Simply learn from it and be inspired |
Step 4. Use the Data
In the end, GCD generates properly formatted Json. It does not prescribe a delivery mechanism. The system is flexible to how game makers choose to use the data in the game project.
Weapon Objects
For example, here is a Google Sheet with GCD is used to configure the following data set.
| Input | Output | |||||||||||||||
|---|---|---|---|---|---|---|---|---|---|---|---|---|---|---|---|---|
|
{
  "Weapons": [
    {
      "Name": "Sword",
      "Damage": 20
    },
    {
      "Name": "Dagger",
      "Damage": 5
    },
    {
      "Name": "Spear",
      "Damage": 30
    }
  ]
}
|
Here are 3 popular usage techniques.
Usage A. Load Json from local storage
The game maker exports the data to flat files, adds them to the Unity project, and loads them locally as needed.
Pros
- Simple implementation
Cons
- Large amounts of data may bloat the binary
- No over-the-wire updates, thus requiring users to redownload the entire game client
- Workflow has challenges — manual process is error prone (requires a human to export the data, download it, and copy it to the Unity project)
Setup
Step | Detail |
|---|---|
| • Open a Google Sheet with GCD |
| • See |
| • See |
| • See |
Usage B. Load Json from online storage
The game maker prepares the data, hosts it, and loads it remotely as needed.
As Google's documentation shows, directly calling Google Sheets is rate limited, thus game makers must create a custom hosting and delivery solution.
Pros
- Supports over-the-wire updates without requiring users to redownload the entire game client
Cons
- Requires paying for a dedicated host, and managing it
- Workflow has challenges — error prone if manual, complex to build if automated (requires build jobs with rollback functionality, etc ...)
Setup
Step | Detail |
|---|---|
| • Open a Google Sheet with GCD |
| • See |
| • See |
| • See |
Code
Beamable SDK Examples• The following example code is available for download at GitHub.com/Beamable_SDK_Examples
using UnityEngine;

namespace Beamable.Examples.Labs.GameContentDesigner.Json
{
   [System.Serializable]
   public class WeaponJson
   {
      public string Name;
      public string Damage;
   }

   [System.Serializable]
   public class WeaponsJson
   {
      public WeaponJson[] Weapons;
   }

   /// <summary>
   /// Demonstrates <see cref="GameContentDesignerDemo"/>.
   /// </summary>
   public class GameContentDesignerDemo_Json : MonoBehaviour
   {
      //  Fields  ---------------------------------------

      [SerializeField]
      private TextAsset _weaponsJson;

      //  Unity Methods  --------------------------------
      protected void Start()
      {
         Debug.Log($"Start()");

         WeaponsJson weapons = JsonUtility.FromJson<WeaponsJson>(_weaponsJson.text);

         foreach (WeaponJson weapon in weapons.Weapons)
         {
            Debug.Log($"weapon.Name = {weapon.Name}, weapon.Damage = {weapon.Damage}");
         }
      }
   }
}
Usage C. Use Beamable SDK
Beamable is optional for GCD. However, to complete this specific usage option, the Beamable SDK and a Beamable license are required.
Pros
- Over the wire updates
- Simple to deploy and rollback content
- No need to pay for a dedicated host, scalable by default
- Workflow is smooth with automated process for releasing data updates
Cons
- Requires Beamable SDK and work to create C# classes in Unity so data can be downloaded at runtime
Setup
Step | Detail |
|---|---|
1a. Prepare the Content | • Open a Google Sheet with GCD *Note: This data is visually inspectable via Beamable's Web-basedPortal * |
1b. Prepare the Unity Project | • Within Unity, add the Beamable SDK and Login (See Installing Beamable) |
| • Open the Content Manager Window |
| • GCD does not include code generation capabilities. In order to convert content to C# objects, you should create classes that derive from |
| • See |
Code
Beamable SDK Examples• The following example code is available for download at GitHub.com/Beamable_SDK_Examples
using Beamable.Common.Content;
using UnityEngine;

namespace Beamable.Examples.Labs.GameContentDesignerDemo.Content
{
   [ContentType("gcd_weapon")]
   public class GCDWeapon : ContentObject
   {
      public string Name;
      public string Damage;
   }

   [ContentType("gcd_weapons")]
   public class GCDWeapons : ContentObject
   {
      public WeaponContentRef[] WeaponContentRefs;
   }

   [System.Serializable]
   public class WeaponContentRef : ContentRef<GCDWeapon> { }

   [System.Serializable]
   public class WeaponsContentRef : ContentRef<GCDWeapons> { }

   /// <summary>
   /// Demonstrates <see cref="GameContentDesignerDemo"/>.
   /// </summary>
   public class GameContentDesignerDemo_Content : MonoBehaviour
   {
      //  Fields  ---------------------------------------
      [SerializeField] private WeaponsContentRef _weaponsContentRef = null;

      //  Unity Methods   -------------------------------
      protected async void Start()
      {
         Debug.Log($"Start()");

         GCDWeapons weaponsContent = await _weaponsContentRef.Resolve();

         foreach (WeaponContentRef weaponContentRef in weaponsContent.WeaponContentRefs)
         {
            GCDWeapon weapon = await weaponContentRef.Resolve();

            Debug.Log($"weapon.Name = {weapon.Name}, weapon.Damage = {weapon.Damage}");
         }
      }
   }
}
Advanced
This section contains any advanced configuration options and workflows.
Settings

Settings stored within cell notes
Mouse over a schema header to reveal the cell notes. Notes store the column metadata.
- Sheet Settings - Store the export settings for a entire sheet. (e.g. Export format and export key)
- Column Settings - Stores the export settings for a given column (e.g. Handling empty cells)
- Validation Settings - Store the validation settings (e.g. Number vs string) for a given sheet's column's
These hints make efficent use of concepts and workflows.
Best PracticeWhile cell notes can be edited manually, it is recommended to use the provided settings UI
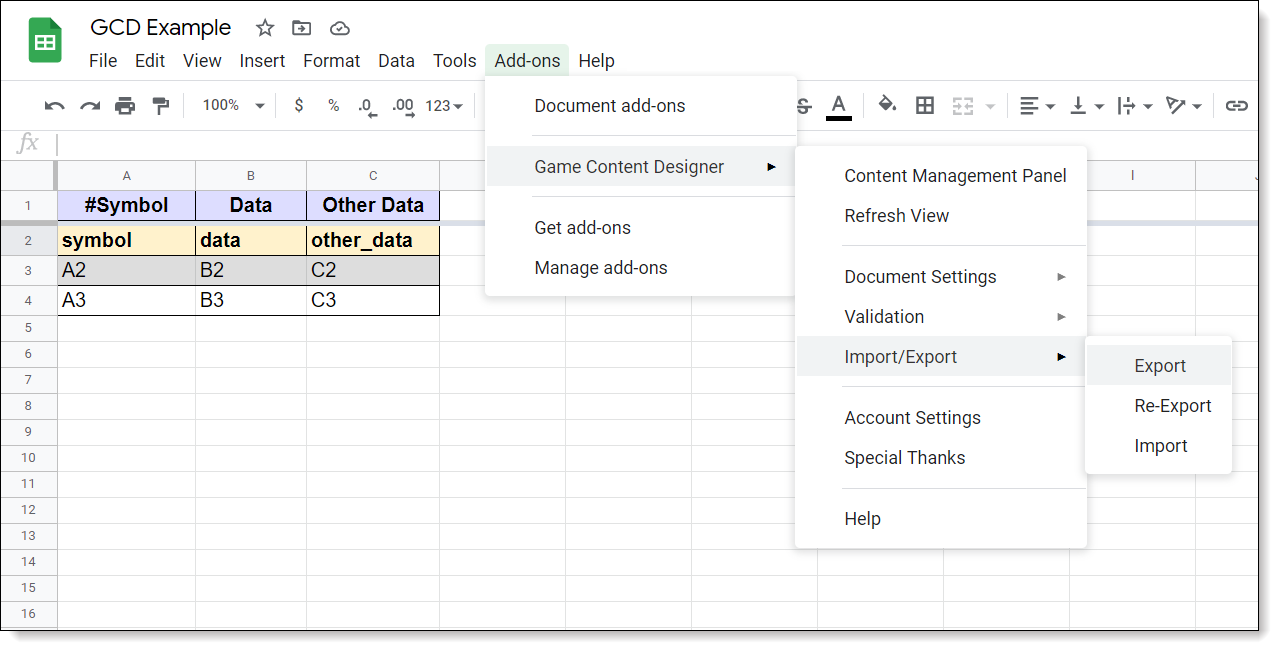
• Sheet Settings - Google Sheet → Add-Ons → Game Content Designer → Documentation Settings
• Column Settings - Google Sheet → Add-Ons → Game Content Designer → Documentation Settings
• Validation Settings - Google Sheet → Add-Ons → Game Content Designer → Validation
Delimiters

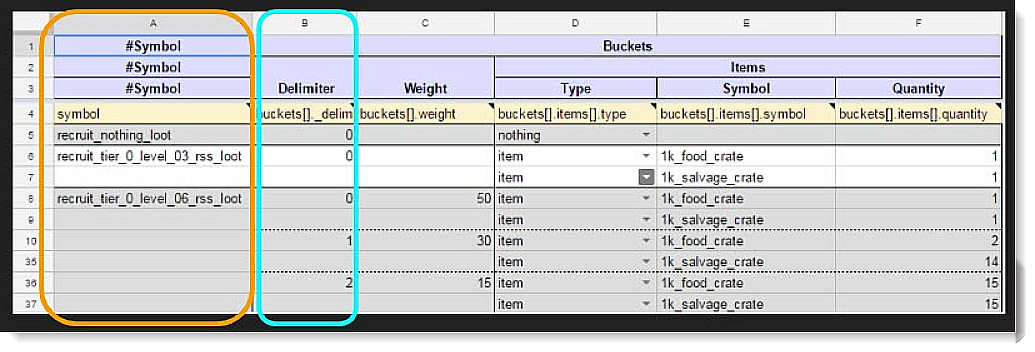
Delimiter stored within column "B"
A delimiter is a sequence of one or more characters used to specify the boundary between separate, independent regions in plain text or other data streams. See Wikipedia's Delimiter Overview for more info.
- Delimiters are how GCD distinguished where an array entry begins. Bottom level arrays don’t need one, but everything else does. These columns can be any text, importing will make them the array's index they are delimiting. These columns are not actually exported.
- The first column is always treated like a delimiter when exporting lists. You can make the first column unexported by giving it an underscore prefix. Note that to do this you will need to export as one sheet instead of splitting into individual files.
Updated 3 months ago

 • (Google Sheet → Add-Ons → Game Content Designer)