Microservices
Developing Standalone Microservices with the Beam CLI
Beamable offers a rich microservice development workflow using the Beam CLI and Dotnet. Microservices deploy to the Beamable Cloud, and offer a secure way to handle server-side authoritative logic for your games.
Dependencies
Before you can develop a Beamable Standalone Microservice, you need to complete the Getting-Started Guide. That means having Dotnet 8 installed, and getting the Beam CLI.
You can confirm you have everything installed checking the versions of the tools.
dotnet --version
dotnetbeam version # beam --version also works.
Quick Start
Standalone Microservices require a .beamable workspace, so you either need to create one with beam init, or use an existing one.
beam init MyProject
cd MyProject
Once you have a .beamble workspace, you can create a new Standalone Microservice using the project new command.
# run this inside your .beamable workspace
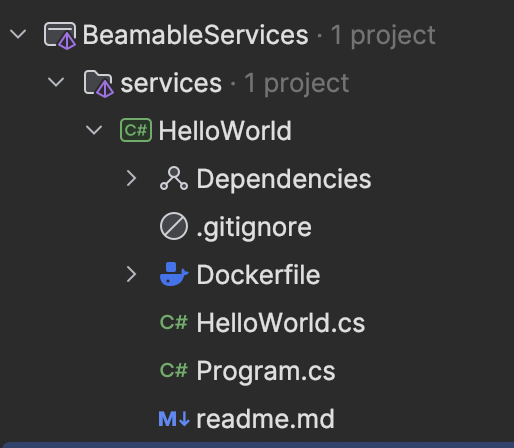
dotnet beam project new service HelloWorldA new file, BeamableServices.sln has been created in /MyProject. Open it in your IDE of choice (Visual Studio Code, Rider, or Visual Studio).
Congratulations, you have a local Beamable Standalone Microservice! To run it, you can use the IDE tooling to start the HelloWorld project, or you can use the project run command. If you're familiar with dotnet, you can also use the normal dotnet run command as well.
However you decide to run the project, you should see a stream of logs similar to the snippet below,
13:25:33.077 [DBUG] Service provider initialized
13:25:33.307 [DBUG] Event provider initialized
13:25:33.308 [INFO] Service ready for traffic.baseVersion=2.0.0-PREVIEW.RC2 executionVersion= portalURL=https://portal.beamable.com/cid/games/DE_1751365810229268/realms/pid/microservices/HelloWorld/docs?refresh_token=redacted&prefix=redacted
The service is running! You can send requests to the service over HTTPS. To verify, you can open the local Open API documentation by using the project open-swagger command.
dotnet beam project open-swaggerYour local web browser should open to the Beamable Portal, showing the local Open API documentation,
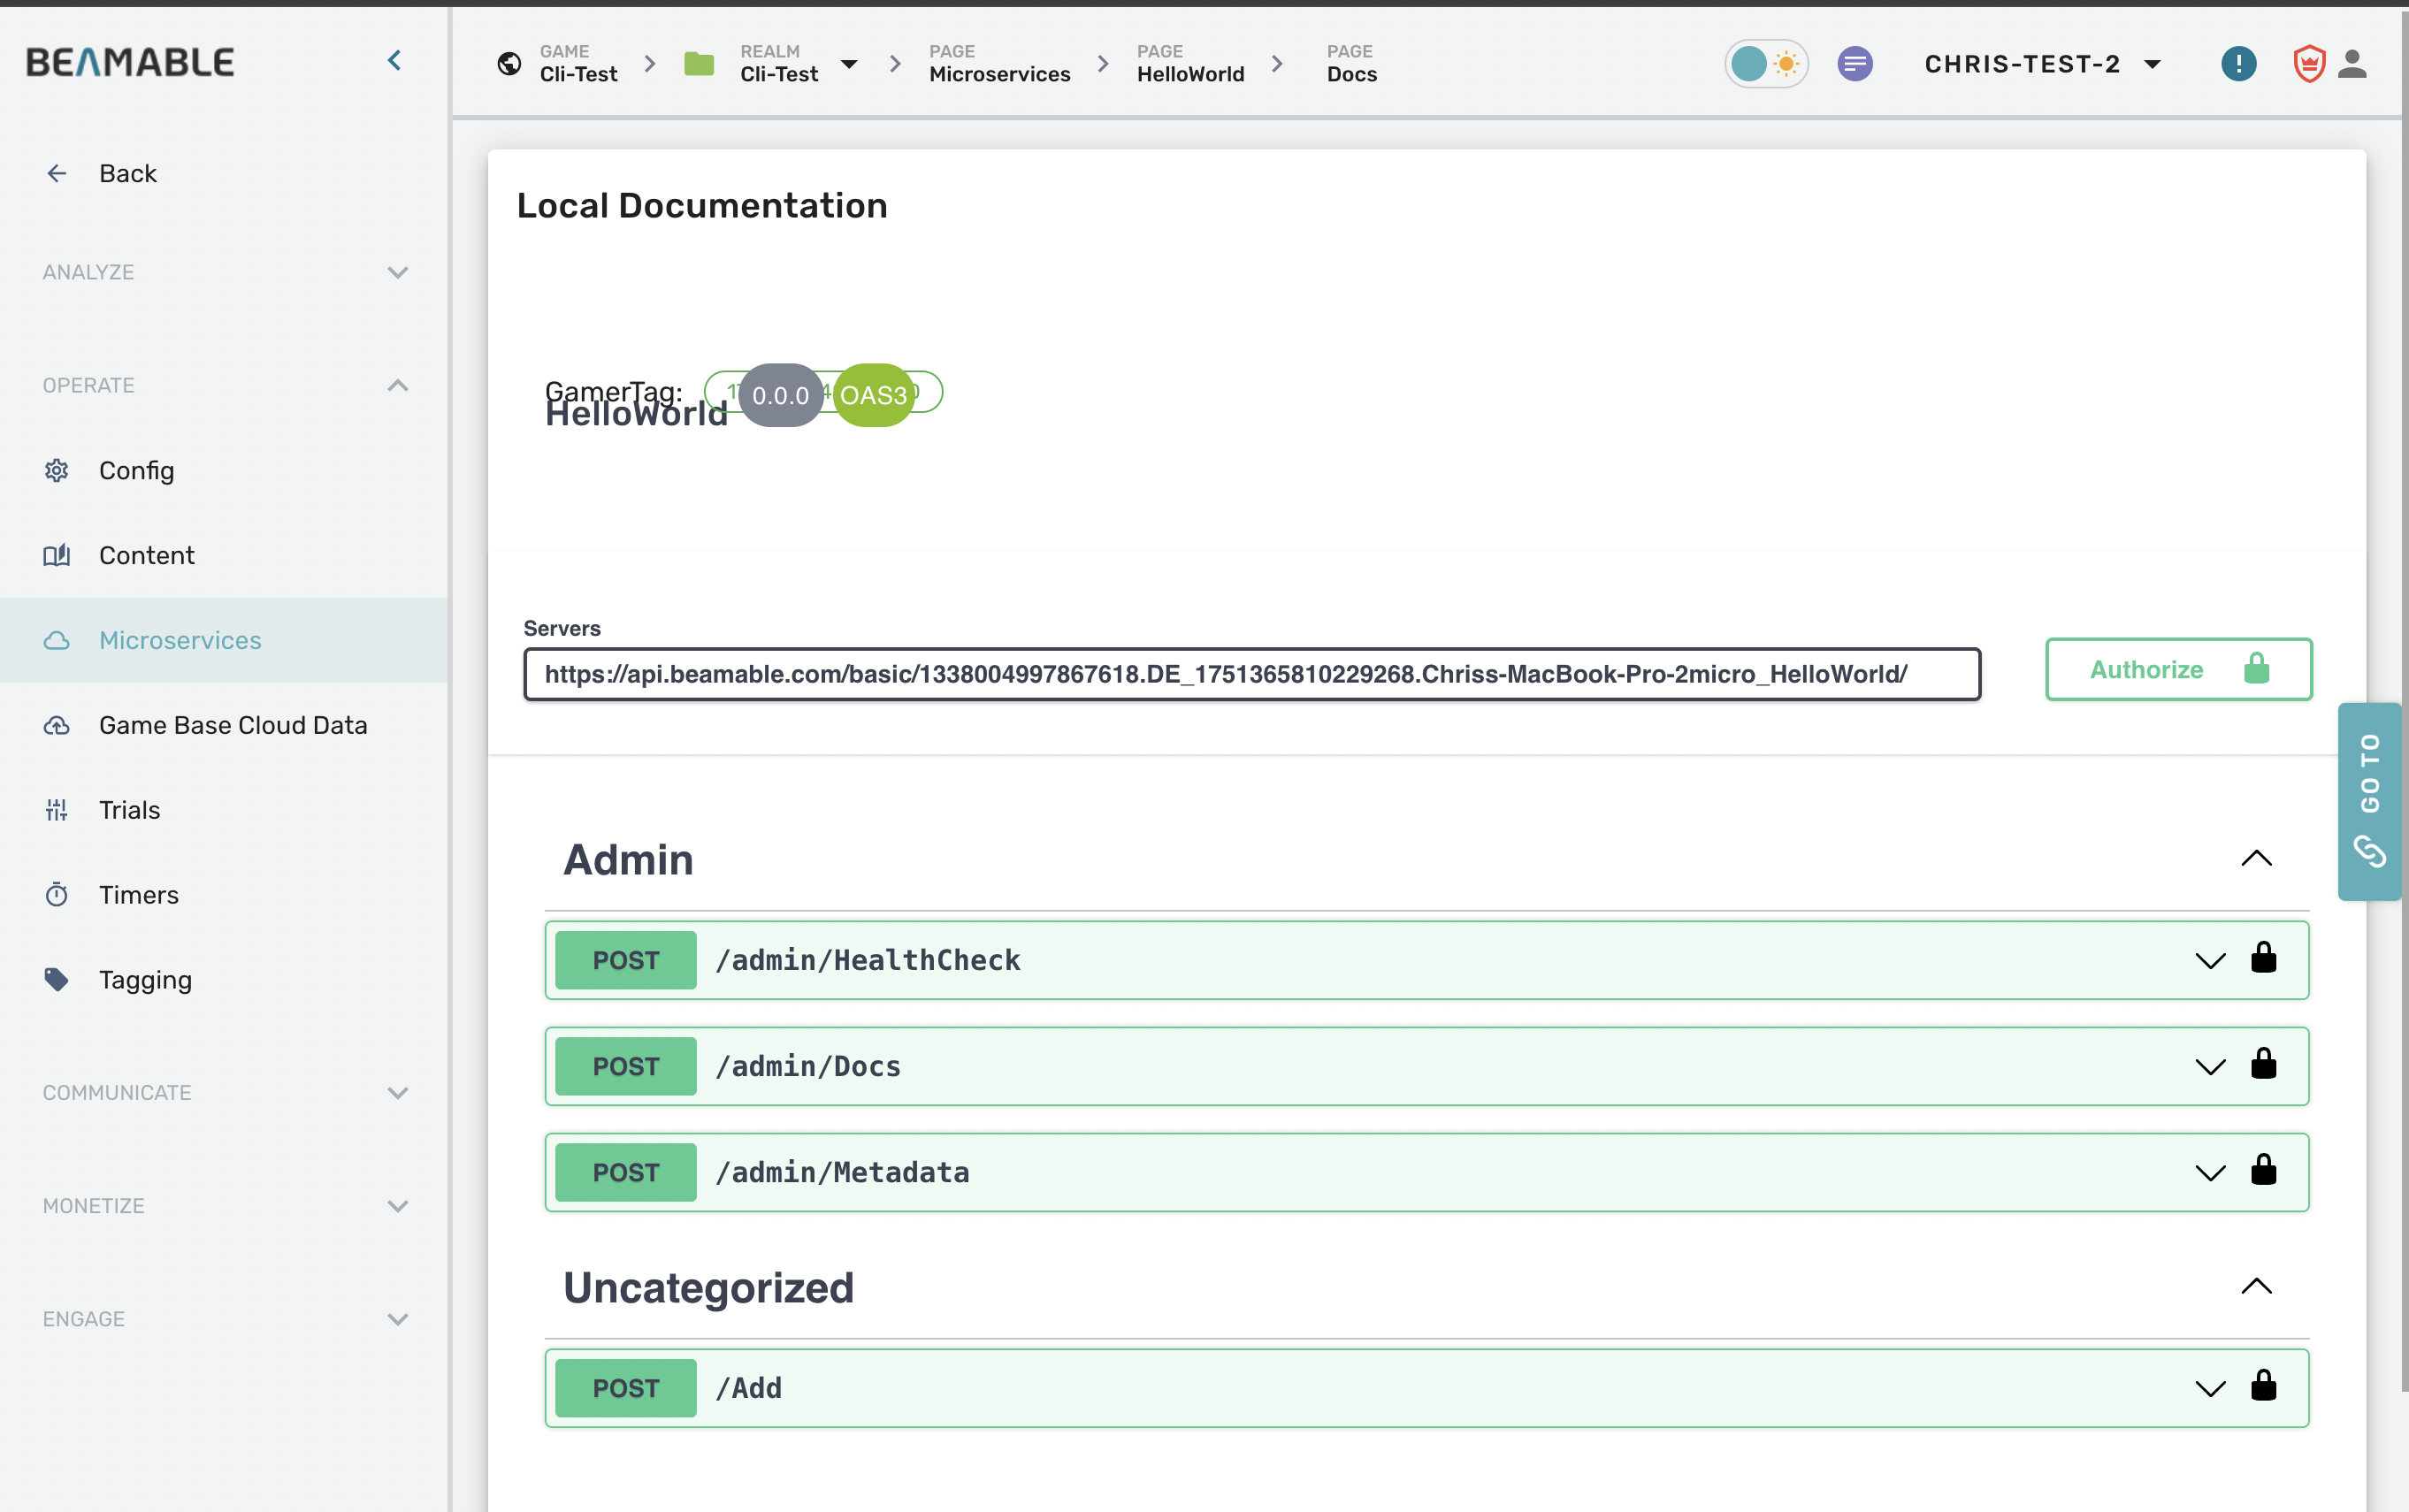
Click on the last green button that says, "POST /Add", and then select the "Try It Out" button. In the Request Body, enter some sample JSON,
{
  "a": 2,
  "b": 3
}
And then click the Execute button! In your Standalone Microservice project, you should see some logs appear indicating the service was invoked.
13:30:18.945 [DBUG] Handling AddThe Add function is defined in the HelloWorld.cs file.
using Beamable.Server;

namespace Beamable.HelloWorld
{
    [Microservice("HelloWorld")]
    public class HelloWorld : Microservice
    {
       [ClientCallable]
       public int Add(int a, int b)
       {
	       return a + b;
       }
    }
}
You can write new functions and tag them with [ClientCallable] to make them accessible on the Open API page. And now you know the basics of working with Beamable Standalone Microservices!
Project Structure
Each file in the Standalone Microservice has a valuable function that is important to understand.
| file | function |
|---|---|
MyProject/services/.gitignore | a version control file that will ignore build and intermediate folders from your git based source control |
MyProject/services/Dockerfile | When the Standalone Microservice is deployed, it will be containerized using Docker. You can modify the Dockerfile to extend the capabilities of the service. See the Deployment Section for more details |
MyProject/services/HelloWorld.cs | This file is the main .cs file that has your server functionality |
MyProject/services/Programcs | This file is the entry point of the dotnet application. It bootstraps the server and starts it. You may edit it, but make sure not to remove the section that enables the service. |
MyProject/services/HelloWorld.csproj | This file is the dotnet project file for your service. You can modify the .csproj file to customize your service. See the Microservice Configuration Section section for more details |
MyProject/BeamableServices.sln | This file is the dotnet solution file, and organizes your services. If you add additional services or storage databases, they will be tracked through the .sln file. |
Next Steps
There are many topics to continue learning about Beamable Standalone Microservices,
- Deploy your Microservice to the Beamable Cloud
- Debugging Techniques
- Add a Beamable Database Storage Object
- Microservice Configuration Settings
- Beam CLI Commands for Managing Microservices
- Microservice Routing and Client Usage
Possible Issues and Solutions
Multiple Microservice Classes Detected
Explanation:
Only one Microservice class should exist per microservice project. Multiple classes marked with the [Microservice] attribute will cause conflicts in code generation and runtime behavior.
Example Code Triggering the Error:
[Microservice("MyMicroservice")]
public partial class MyMicroservice : Microservice {}

[Microservice("MyOtherMicroservice")]
public partial class MyOtherMicroservice : Microservice {}
Example Error Message:
Multiple Microservice classes detected. Make sure only a single class implementing Microservice exists in each service project. ClassNames=MyMicroservice, MyOtherMicroservice.Solutions:
- Ensure only one class is marked as a
Microservicein your project.
Example of Solved Code:
[Microservice("MyMicroservice")]
public partial class MyMicroservice : Microservice {}
Non-Partial Microservice Class Detected
Explanation:
Microservice classes must be marked as partial to allow code generation tools to extend them.
Example Code Triggering the Error:
[Microservice("MyMicroservice")]
public class MyMicroservice : Microservice {}
Example Error Message:
Non-Partial Microservice class detected. Make sure your Microservice class is marked as partial.Solutions:
- Add the
partialmodifier to the class.
Example of Solved Code:
[Microservice("MyMicroservice")]
public partial class MyMicroservice : Microservice {}
Microservice Class Missing Microservice Id
Explanation:
The Microservice class must include the [Microservice("Id")] attribute to define its identifier.
Example Code Triggering the Error:
public partial class MyMicroservice : Microservice {}Example Error Message:
Microservice class is missing the microservice idSolutions:
- Add the
[Microservice("Id")]attribute to the class.
Example of Solved Code:
[Microservice("MyMicroservice")]
public partial class MyMicroservice : Microservice {}
Async Void Callable Methods
Explanation:
Methods marked as [Callable], [ClientCallable], [ServerCallable] should not be async void. Using async void makes it impossible to track errors or await completion.
Example Code Triggering the Error:
[Microservice("MyMicroservice")]
public partial class MyMicroservice : Microservice
{
    [Callable]
    public async void CallMicroservice() {}
}
Example Error Message:
Microservice Callable methods cannot be async voids. Ex: CallMicroservice.Solutions:
- Change the return type to
Task.
Example of Solved Code:
[Microservice("MyMicroservice")]
public partial class MyMicroservice : Microservice
{
    [Callable]
    public async Task CallMicroservice() {}
}
Invalid Type Usage in Callable Method
Explanation:
Types used in [ClientCallable] methods must be available to both server and client. Declaring types inside the microservice class makes them inaccessible to the Unity client.
Example Code Triggering the Error:
[Microservice("MyMicroservice")]
public partial class MyMicroservice : Microservice
{
        [ClientCallable]
    public async Task<DTO> CallServiceAsync() => new DTO { x = 1 };

    [ClientCallable]
    public void CallService(DTO data) {}
}

public class DTO
{
    public int x;
}
Example Error Message:
Microservice Callable method CallServiceAsync uses a Type that cannot be inside microservice scope. Type: DTO.Solutions:
- Move shared types (DTOs, Enums, etc.) to a shared project referenced by both Unity and the server.
Example of Solved Code (Microservice):
[Microservice("MyMicroservice")]
public partial class MyMicroservice : Microservice
{
    [ClientCallable]
    public async Task<DTO> CallServiceAsync() => new DTO { x = 1 };

    [ClientCallable]
    public void CallService(DTO data) {}
}
Shared Project Code:
public class DTO
{
    public int x;
}
Callable Method Types usage are Nested
Explanation:
Types used in [ClientCallable] methods must be declared in outer scope so the Source Code Generator can handle it properly.
Example Code Triggering the Error:
[Microservice("MyMicroservice")]
public partial class MyMicroservice : Microservice
{
    public class DTO
    {
        public int x;
    }

    [ClientCallable]
    public void CallService(DTO data) {}
}
Example Error Message:
{nameof(Server.Microservice)} Callable method CallService uses a Type that is Nested, which is not supported by the Source Code Generator. Please move DTO to outer scope.Solutions:
- Move named types used by
Callablemethods to a non-nested scope.
Example of Solved Code:
[Microservice("MyMicroservice")]
public partial class MyMicroservice : Microservice
{
    [ClientCallable]
    public void CallService(DTO data) {}
}

public class DTO
{
    public int x;
}
Beam Generated Schema Class is a Nested Type
Explanation:
Classes that uses the attribute [BeamGenerateSchema] cannot be declared as nested type because the Source Generator Cannot handle it.
Example Code Triggering the Error:
[Microservice("MyMicroservice")]
public partial class MyMicroservice : Microservice
{
    [BeamGenerateSchema]
    public class DTO
    {
        public int x;
    }
}
Example Error Message:
Type DTO contains [BeamGenerateSchema] attribute and is a Nested type, which is not supported by the Source Code Generator. Please move DTO to outer scope.Solutions:
- Move classes that contains
[BeamGenerateSchema]attribute to a non-nested scope.
Example of Solved Code:
[Microservice("MyMicroservice")]
public partial class MyMicroservice : Microservice { }

[BeamGenerateSchema]
public class DTO
{
    public int x;
}
Invalid Microservice ID
Explanation:
Microservices IDs must match the <BeamID> property on csproj. If there is none <BeamID> property it needs to match the project's name.
Example Code Triggering the Error:
[Microservice("MyMicroservice")]
public partial class MyMicroservice : Microservice {}
Example CSProj Triggering the Error:
<Project Sdk="Microsoft.NET.Sdk">
    ...
    <PropertyGroup Label="Beamable Settings">
        ...
        <BeamId>OtherBeamId</BeamId>
        ...
    </PropertyGroup>
    ...
</Project>
Example Error Message:
Microservice ID: `MyMicroservice` is invalid, it needs to be the same as <BeamId> csharp property (or as csproj name if none exist): `OtherBeamId`Solutions:
- Switch
Microserviceattribute parameter to use the same value as<BeamId>
Example of Solved Code:[Microservice("OtherBeamId")] public partial class MyMicroservice : Microservice { } [BeamGenerateSchema] public class DTO { public int x; } - Update
<BeamId>property to match theMicroserviceattribute value
Example of Solved CSProj:<Project Sdk="Microsoft.NET.Sdk"> ... <PropertyGroup Label="Beamable Settings"> ... <BeamId>MyMicroservice</BeamId> ... </PropertyGroup> ... </Project>
Static Field in Microservice
Explanation:
Non-readonly static fields in Microservices are discouraged because they do not behave reliably in horizontally scaled environments. Their state is not shared across instances.
Example Code Triggering the Warning:
public partial class MyMicroservice : Microservice
{
    public static string ContentId = "coins.gems";
}
Example Warning Message:
Consider making 'ContentId' a readonly field. Otherwise the value may be inconsistent in production environments.Solutions:
- Make the static field
readonlyif it's intended to be constant after initialization.
Example of Solved Code:public partial class MyMicroservice : Microservice { public static readonly string ContentId = "coins.gems"; } - Or convert it to a non-static field if it should be instance-bound.
Missing Serializable Attribute on Type
Explanation:
All types used in Microservice method signatures or marked with [BeamGenerateSchema] must be annotated with [Serializable] to ensure correct serialization and code generation.
Examples Code Triggering the Error:
[BeamGenerateSchema]
public class MyDto
{
    public int x;
}
public class MyOtherDto
{
    public int x;
}
[Microservice("OtherBeamId")]
public partial class MyMicroservice : Microservice
{
    [ClientCallable]
    public void CallService(MyOtherDto data) {}
}
Example Error Messages:
Add the [Serializable] attribute to type 'MyDto'Add the [Serializable] attribute to type 'MyOtherDto'Solution:
- Add the
[Serializable]attribute.
Example of Solved Code:[Serializable] [BeamGenerateSchema] public class MyDto { public int x; } [Serializable] public class MyOtherDto { public int x; } [Microservice("OtherBeamId")] public partial class MyMicroservice : Microservice { [ClientCallable] public void CallService(MyOtherDto data) {} }
Property Found in Serializable Type
Explanation:
Properties in types used in Microservice method signatures or marked with [BeamGenerateSchema] are ignored by the client code generator. Fields should be used instead.
Example Code Triggering the Warning:
[Serializable]
public class MyDto
{
    public int X { get; set; }
}
Example Warning Message:
Consider changing property 'X' to a field to include it in client-generated codeSolution:
- Use fields instead of properties.
Example of Solved Code:[Serializable] public class MyDto { public int X; }
Nullable Field in Serializable Type
Explanation:
Fields with nullable types (e.g., int?, string?) are not supported in types used in Microservice method signatures or marked with [BeamGenerateSchema]. Use Optional<T> instead to ensure predictable behavior.
Example Code Triggering the Error:
[Serializable]
public class MyDto
{
    public int? Score;
}
Example Error Message:
Change field 'Score' to use Optional<T> instead of a nullable typeSolution:
- Use
Optional<T>instead of nullable types.
Example of Solved Code:[Serializable] public class MyDto { public Optional<int> Score; }
Invalid ContentObject Used
Explanation:
Using ContentObject or its subtypes directly in serializable fields or parameters is discouraged, as it may lead to large data payloads. Instead, prefer using ContentRef<T> to reference content objects efficiently.
Example Code Triggering the Error:
[BeamGenerateSchema]
public class MyDTO
{
    public MyItem item;
}

public class MyItem : ContentObject {}
Example Error Message:
Change 'item' to use ContentRef<MyItem> instead of MyItemSolution:
- Replace the direct
ContentObjectusage withContentRef<T>.
Example of Solved Code:
[BeamGenerateSchema]
public class MyDTO
{
    public ContentRef<MyItem> item;
}

public class MyItem : ContentObject {}
Type Used in BeamGenerateSchema is Missing Attribute
Explanation:
When a class is marked with [BeamGenerateSchema], all custom types used in its fields must also be annotated with [BeamGenerateSchema].
Example Code Triggering the Error:
[BeamGenerateSchema]
public class MyDTO
{
    public MyOtherDTO otherDTO;
}
public class MyOtherDTO
{
    public int Value;
}
Example Error Message:
Add the [BeamGenerateSchema] attribute to type 'MyOtherDTO'Solution:
- Add
[BeamGenerateSchema]to all nested field types.
Example of Solved Code:[BeamGenerateSchema] public class MyDTO { public MyOtherDTO otherDTO; } [BeamGenerateSchema] public class MyOtherDTO { public int Value; }
Dictionary Key Must Be String on Serializable Types
Explanation:
When using a Dictionary field in a type marked with [BeamGenerateSchema], the key must be of type string. Other key types are not supported.
Example Code Triggering the Error:
[BeamGenerateSchema]
public class MyDTO
{
    public Dictionary<int, string> InvalidDict;
}
Example Error Message:
Change the dictionary key of field 'InvalidDict' to string instead of type 'int'Solution:
- Change the dictionary key type to
string.
Example of Solved Code:
[BeamGenerateSchema]
public class MyDTO
{
    public Dictionary<string, string> ValidDict;
}
Field on Serializable Type Is Subtype From Dictionary
Explanation:
Types that subclass Dictionary are not supported as field types in [BeamGenerateSchema] annotated classes.
Example Code Triggering the Error:
public class MyDict : Dictionary<string, string> {}

[BeamGenerateSchema]
public class MyDTO
{
    public MyDict customDict;
}
Example Error Message:
Replace field 'customDict' to Dictionary instead of type 'MyDict'Solution:
- Use
Dictionary<string, T>directly instead of a subclass.
Example of Solved Code:
[BeamGenerateSchema]
public class MyDTO
{
    public Dictionary<string, string> customDict;
}
Field on Serializable Type Is Subtype From List
Explanation:
Types that subclass List<T> are not supported as field types in [BeamGenerateSchema] annotated classes.
Example Code Triggering the Error:
public class MyList : List<string> {}

[BeamGenerateSchema]
public class MyDTO
{
    public MyList customList;
}
Example Error Message:
Replace field 'customList' to List instead of type 'MyList'Solution:
- Use
List<T>directly instead of a subclass.
Example of Solved Code:
[BeamGenerateSchema]
public class MyDTO
{
    public List<string> customList;
}
Callable Method Declaration Type Is ContentObject Subtype
Explanation:
Types used in Callable methods cannot inherit from ContentObject. Only the base ContentObject is supported.
Example Code Triggering the Error:
public class MyContent : ContentObject {}

public class MyMicroservice : Microservice
{
    [Callable]
    public Task DoSomething(MyContent input) => Task.CompletedTask;
}
Example Error Message:
Change type 'MyContent' to use the base ContentObject type instead of a subtypeSolution:
- Use
ContentObjectinstead of a derived type.
Example of Solved Code:
public class MyMicroservice : Microservice
{
    [Callable]
    public Task DoSomething(ContentObject input) => Task.CompletedTask;
}
Callable Method Declaration Type Is Invalid Dictionary
Explanation:
Dictionaries in [Callable] method parameters are only valid if their keys are of type string.
Example Code Triggering the Error:
public class MyMicroservice : Microservice
{
    [Callable]
    public Task DoSomething(Dictionary<int, string> input) => Task.CompletedTask;
}
Example Error Message:
Change the dictionary key of 'input' to string instead of type 'int'Solution:
- Change dictionary key to
string.
Example of Solved Code:
public class MyMicroservice : Microservice
{
    [Callable]
    public Task DoSomething(Dictionary<string, string> input) => Task.CompletedTask;
}
Callable Method Declaration Type Is Subtype From Dictionary
Explanation:
Types used in [Callable] methods that subclass Dictionary are not supported.
Example Code Triggering the Error:
public class MyDict : Dictionary<string, string> {}

public class MyMicroservice : Microservice
{
    [Callable]
    public Task DoSomething(MyDict input) => Task.CompletedTask;
}
Example Error Message:
Replace 'input' to Dictionary instead of type 'MyDict'Solution:
- Use
Dictionary<string, T>directly.
Example of Solved Code:
public class MyMicroservice : Microservice
{
    [Callable]
    public Task DoSomething(Dictionary<string, string> input) => Task.CompletedTask;
}
Callable Method Declaration Type Is Subtype From List
Explanation:
Types used in [Callable] methods that subclass List<T> are not supported.
Example Code Triggering the Error:
public class MyList : List<string> {}

public class MyMicroservice : Microservice
{
    [Callable]
    public Task DoSomething(MyList input) => Task.CompletedTask;
}
Example Error Message:
Replace 'input' to List instead of type 'MyList'Solution:
- Use
List<T>directly.
Example of Solved Code:
public class MyMicroservice : Microservice
{
    [Callable]
    public Task DoSomething(List<string> input) => Task.CompletedTask;
}
Updated 9 months ago