Microservices - Class Sharing
Assembly Definition for C# Microservice class sharing [CLCP-Microservices-09]
Overview
In order to allow Microservices to use new classes that you have defined, you will need to add an assembly definition and then reference it. This guide will outline the process for doing that. General docs for Unity assembly definitions are here: Unity - Manual: Assembly definitions.
Step 1. Create Assembly Definition
Create an assembly definition asset in the folder where your new classes reside. All C# code files in that folder will be included in this new assembly definition.

You can name the assembly definition whatever you like. In this example, it is named the same as the folder: CustomContentTypes.
(optional) Add Beamable.Runtime.Common and Beamable.Server.Runtime.Shared to the references in this new assembly definition. This will allow your code access to Beamable types.
Step 2. Locate Microservices Folder
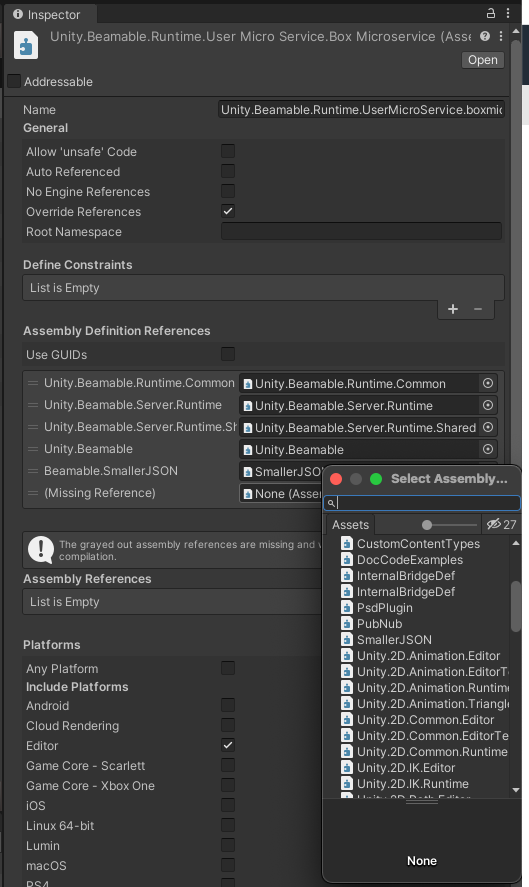
Find your Microservice folder. In this example, one such path is: Assets/Beamable/Microservices/BoxMicroservice/. Select the automatically generated assembly definition within that folder. The icon looks like a little jigsaw puzzle piece.

Step 3. Add Assembly Definition Reference
In the Inspector, add an entry to the Assembly Definition References section. Using either drag-and-drop or the little target icon, point the reference at the assembly definition you made in Step 1.

GUID Assembly References
Microservices with GUID assembly references in pre-1.2 versions will not work and should remain turned off in those versions. However, as of Beamable 1.2 the "Use GUIDs" checkbox on an assembly definition will work as expected.
Step 4. Rebuild Microservice
Rebuild your Microservice. From here on out, your Microservice will be able to reference classes in the folder with the assembly definition.
Updated about 1 year ago
