Stores - Guide
Allow players to purchase items from in-game stores [ECON-Stores-02]
Overview
The purpose of this guide is for game makers to setup a complete store experience using Beamable.
This guide includes everything needed to use the Store Flow Feature Prefab in the "Beamable SDK for Unity". Or watch this video.
Video Series
Part 1 & 2
Part 3
Game Maker User Experience
There are 3 major parts to Store setup process. During development, the game maker's user experience is as follows:
Steps
Follow these steps to get started:
Note: The game maker is to choose either Step 1a or Step 1b. Not both.
Step 1a. Set up Unity IAP
This step assumes a dependency on Unity's UnityIAP solution. There is little or no custom code required for this solution.
A benefit here is fast development.
| Step | Detail |
|---|---|
| 1. Open the Unity Services Window | • Unity → Window → General → Services |
| 2. Activate the Unity "IAP" Service | 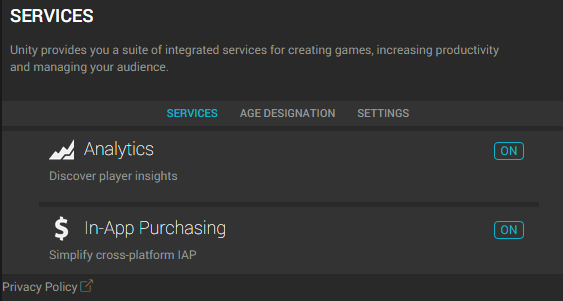 • Click the "On" button Note: After this step, continue per Step 2 |
Step 1b. Set up Custom IAP
This step assumes no dependency on Unity's UnityIAP solution. There is significant custom code required for this solution.
A benefit here is flexible development.
| Step | Detail |
|---|---|
| 1. Setup Custom IAP | • See Adding Custom Purchaser for more info Note: After this step, continue per Step 2 |
Step 2. Set up Platform
The following assumes a cross-platform mobile project. Adjust the steps according to the specific target platforms as desired.
| Step | Detail |
|---|---|
| 1. Setup IAP | Choose exactly one of the following solutions 1. Setup IAP for Apple - developer.apple.com/iap 2. Setup IAP for Android - learn.buildfire.com/iap 3. Setup IAP for Steamworks - Integrating Steamworks |
Gotchas
Here are hints to help explain some of the trickier concepts:
• These platform-specific instructions are subject to change because platform development is rapid.
• App Store SKU’s must be properly setup in the App Store(s) before the system will allow the player to complete a Hard Currency purchase.
• The Google Play Console requires an .apk (or .aab) to be uploaded that has billing permissions, before allowing the user to create in-app products. This should be enabled by default if you have the Unity IAP service enabled.
Step 3. Set up Beamable Content
For simplicity, some Beamable data structures may be omitted from this diagram.:
For the setup, objects of types Store, Listing, Item, and SKU are needed. In the following steps, one of each type of object is created.
Note: An Item is a resource archetype, meaning one can be represented in multiple Listings by using a Lookup Table an associated script. See Multiple Listings With Same Item below for more info.
To ease the process, the objects are created in reverse order; starting with the lowest-level concept: SKU.
| Step | Detail |
|---|---|
| 1. Open the Content Manager | • Unity → Window → Beamable → Open Content Manager |
| 2. Create the "SKU" content | 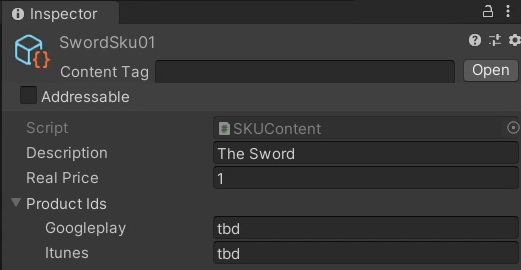 • Select the content type in the list • Press the "Create" button • Populate the content name |
| 3. Configure the "SKU" | 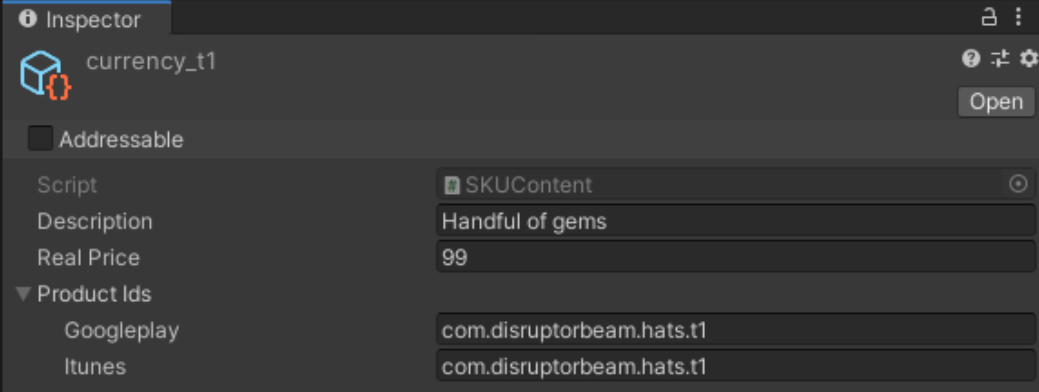 • Populate all fields |
| 4. Create & Configure the "Item" content | 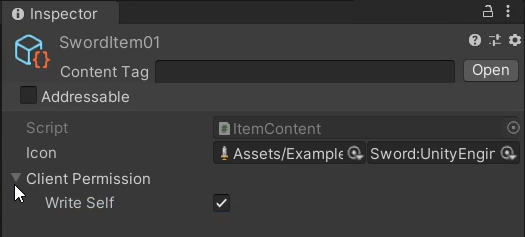 • Select the content type in the list • Press the "Create" button • Populate the required fields |
| 5. Create & Configure the "Listing" content | 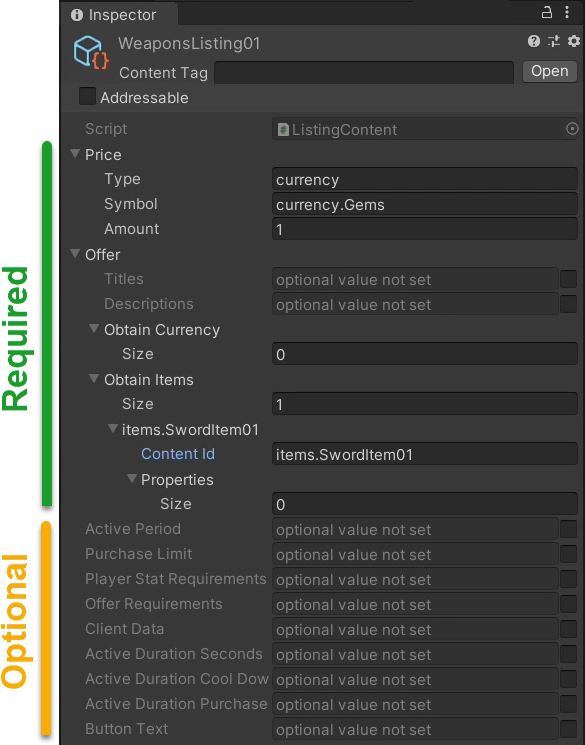 • Select the content type in the list • Press the "Create" button • Populate the required fields Note: Populating optional field too? See Advanced Listings below for more info |
| 6. Create & Configure the "Store" content | 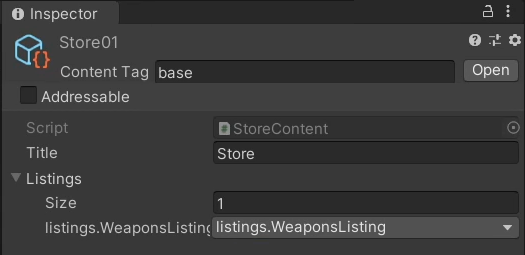 • Select the content type in the list • Press the "Create" button • Populate the content name Note: Active Listing Limit defaults to 20 listings if not set |
| 7. Select the "Shop Configuration" |  • Unity → Window → Beamable → Open Toolbox • Click the "Config" Button |
| 8. Open the "Shop" Configuration | 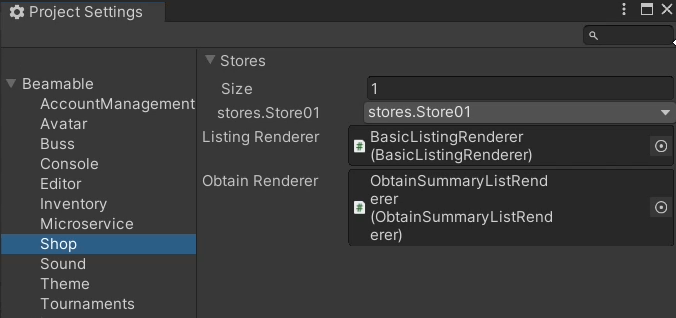 • Populate all fields Note: See Configuration of Item Renderers below for more info |
| 9. Save the Unity Project | • Unity → File → Save Project Best Practice: If you are working on a team, commit to version control in this step |
| 10. Publish the content | • Press the "Publish" button in the Content Manager Window |
Step 4a. Setup Beamable UI
Note: The game maker is to choose either Step 4a or Step 4b. Not both.
A benefit here is fast development.
| Step | Detail |
|---|---|
| 1. Add the "Store Flow" Prefab | • See Store Flow for more info |
Step 4b. Setup Custom UI
A benefit here is flexible development.
| Step | Detail |
|---|---|
| 1. Add the custom store via C# | • See Adding Custom Store for more info |
Advanced
This section contains any advanced configuration options and workflows.
Advanced Listings
The required fields are populated in the Create & Configure the "Listing" content step above.
Here are optional, advanced fields for greater Listing customization.
| Name | Detail |
|---|---|
| Purchase Limit | • Restrict the total lifetime purchase quantity per-player |
| Player Stat Requirement | • Restrict the listing to only players with a specific stat value Example: Available only to players with Strength above 10 |
| Offer Requirement | • Restrict the listing to only players who have purchased another listing Example: The "Arrows" are available only to players who purchased the "Bow" |
| Client Data | • Add arbitrary name/value pairs to be sent along with the listing. For advanced use cases |
| Button Text | • Additional flavor-text Example: "Buy Today!" |
Scheduled Offers
Beamable allows you the ability to schedule particular offers in a store to be available to players starting at a particular date and ending on another date. For example, players will only see a Christmas special offer only during the week of Christmas.” Pairing this to the previously mentioned “SET TIME” cheat and you can be sure that what will be delivered to players is what you’d expect.
The required fields are populated in the Create & Configure the "Listing" content step above.
Here are optional, advanced fields to setup Scheduled Offers for a Listing.
| Name | Detail |
|---|---|
| Active Period | • Restrict the listing to only after a start date • Optionally, also give an end date |
Limited Time Offers
These are very similar to Scheduled Offers but these are player specific. For example, when a player first sees an offer, that player has N minutes to purchase before the offer is no longer available. This creates a sense of urgency to make sure to “get it before it’s too late!”
The required fields are populated in the Create & Configure the "Listing" content step above.
Here are optional, advanced fields to setup Limited Time Offers for a Listing.
| Name | Detail |
|---|---|
| Active Duration Seconds | • Restrict the listing to only a limited time-frame after the player sees the listing in the store Example: "Available for 24 hours from... now." |
| Active Duration Cool Down Seconds | • This requires "Active Duration Seconds" • To create Recurring Offers, specify this “cooldown” which defines the period until the offer becomes active again Example: "Available for 24 hours from... now. After that, available again in 72 hours." |
| Active Duration Purchase Limit | • This requires "Active Duration Seconds" • Restrict the purchase quantity per-player per-active-duration Example: "Available for 24 hours from... now. Maximum 3 purchases allowed." |
Multiple Listings With Same Item
An Item can be singularly represented with an icon as shown above. For example, the data can represent exactly one "Hat".
However an Item can also be re-instanced multiple times for use in the same game project. For example, the data can represent a category of "Hats" with specific sub-types like "Normal Hat", "Magic Hat", and "Stylish Hat".
A Lookup Table allows for reuse of one Item archetype rather than create new Items for each Listing. The Lookup Table may define the name, behavior, icon, and more for each instance of the defined Item archetype.
To create one Item and for use in multiple Listings follow the steps below.
| Step | Detail |
|---|---|
| 1. Create the Lookup Table class file | • Create a new C# file • Copy from MyCustomHatLookupTable.cs shown belowNote: This class derives from Unity's ScriptableObject |
| 2. Create the Lookup Table asset file | • Unity → Asset → Create |
| 3. Configure the Lookup Table asset file |  • Populate all fields |
Code
Beamable SDK Examples
• The following example code is available for download at GitHub.com/Beamable_SDK_Examples
Here is the code for step #1 above. It is presented as inspiration, however the actual code needed will vary per the specific needs of the project.
using UnityEngine;
using Beamable;
using Beamable.Common;

namespace Beamable.Examples.Features.StoreFlow
{

  [System.Serializable]
  public struct HatLookupEntry
  {
    public string Name;
    public HatBehaviour Hat;
    public Sprite PreviewSprite;
  }

  [CreateAssetMenu(
    fileName = "MyCustomHatLookupTable",
    menuName = "Beamable/Examples/Features/MyCustomHatLookupTable",
    order = 0)]

  public class MyCustomHatLookupTable : ScriptableObject
  {
    public List<HatLookupEntry> Hats;

    public HatBehaviour GetHatPrefab(string name) => GetHatEntry(name).Hat;

    public HatLookupEntry GetHatEntry(string name) =>
      Hats.FirstOrDefault(entry =>
                          entry.Name.Equals(name,
                          StringComparison.CurrentCultureIgnoreCase));
  }
}
Configuration of Item Renderers
The ShopConfiguration asset file contains references for these renderers.
- ListingRenderer - This determines the rendering of each Listing UI within the overall Store UI. The default value is
BasicListingRenderer. - ObtainRenderer - This determines the rendering of each Item UI within the overall Listing UI. The default value is
ObtainSummaryListRenderer.

The "Shop" within the Beamable Configuration Manager
The defaults are provided automatically for basic functionality. Override as needed for advanced use cases. The default object's source code is viewable and serves as the starting points for creating custom overrides.
Updated 6 months ago