Microservices - DLLs
Create and deploy server-authoritative C# [CLCP-Microservices-06]
The purpose of this guide is for game makers to create and deploy server-authoritative C# functionality within their games with Beamable Microservices.
This guide includes everything needed to use the Microservices feature in the "Beamable SDK for Unity".
Related Feature
• More details are covered in related feature page(s). See Microservices for more info.
Game Maker User Experience
There are 3 major parts to the process. During development, the game maker's user experience is as follows:
Steps
Follow these steps to get started:
Step 1. Setup Microservice
| Name | Detail |
|---|---|
| 1. Setup Docker 2. Create Microservice 3. Call Microservice | • See Adding Microservices for more info Note: Here the implementation of the Microservice itself may be lean/empty. The goal is to demonstrate a Microservice call and response with no errors |
Step 2. Import DLLs
The Beamable Microservices Feature works with DLL which is .Net-compatible (version "net45"). This includes a vast subset of .NET-compatible DLLs.
For the purposes of this demonstration, Amazon's DynamoDB will be used.

Amazon DynamoDB is a key-value and document database that delivers single-digit millisecond performance at any scale. It's a fully managed, multi-region, multi-active, durable database with built-in security, backup and restore, and in-memory caching for internet-scale applications. DynamoDB can handle more than 10 trillion requests per day and can support peaks of more than 20 million requests per second.
The process of integrating non-Amazon DLL's is similar. Use the steps below as a reference.
| Name | Detail |
|---|---|
| 1. Locate & Download the primary DLL(s) | • Download from the developers (e.g. Amazon's DynamoDB Resources) Note: This may download more or less than the set of DLL(s) for the project's needs. |
| 2. Locate & Download any dependency DLL(s) | There are 2 solution paths here. Choose the one path that works best for the needs of the project... 2.1 - Use Nuget In the Web Browser 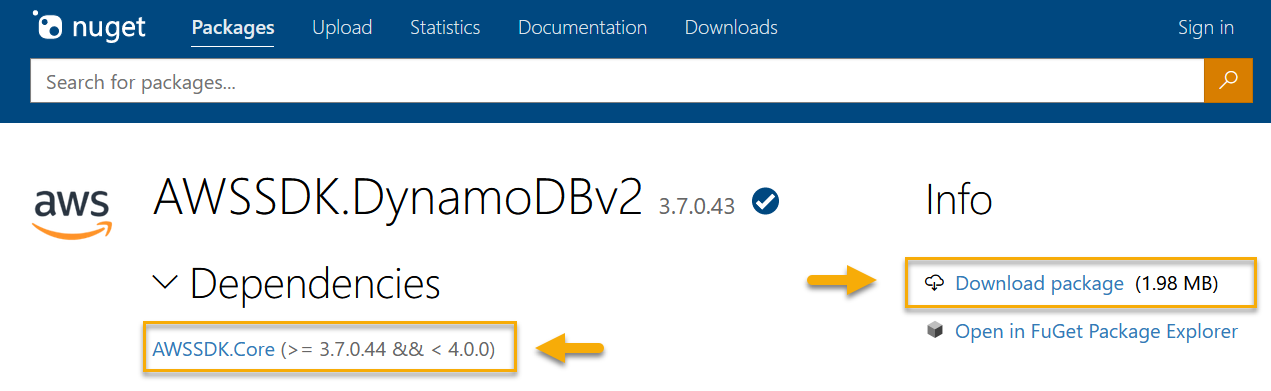 • Search the DLL at Nuget.org Resources) • Expand the 'Dependencies' • Download each dependency (and dependency of each dependency, etc...) • Rename the *.nupkg file to *.zip and unzip• Drag the *.dll file from the file system to any folder within the Unity Project Window.Note: Some unzipped packages will include multiple copies of the DLL file. When in doubt, choose the 'net45' version. 2.2 - Or Use the NugetForUnity Package • See Github.com/GlitchEnzo/NuGetForUnity for more info • Search and import the DLLs needed |
| 3. Add the DLL(s) to the Assembly Definition | 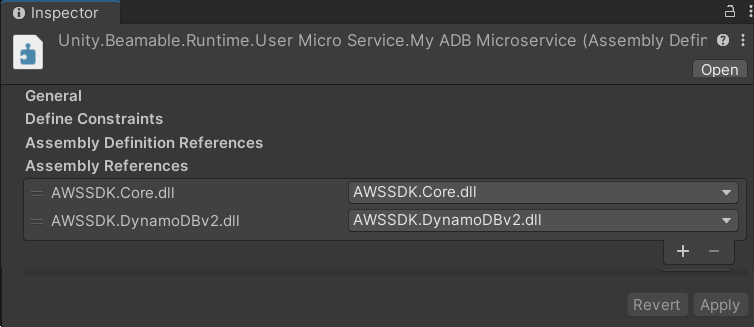 • Ensure Override References checkbox is ticked • Add each DLL to the appropriate Asmdef file Note: Beamable creates an instance of a Unity's Assembly Definition (Asmdef) file for each Microservice |
Step 3. Use DLLs
Work within the Microservice created in Step 1 above.
| Name | Detail |
|---|---|
| 1. Add appropriate 'using' statements | csharp using Amazon.DynamoDBv2; Note: Some code editors will auto-complete this step for you |
| 2. Complete the implementation | csharp AmazonDynamoDBConfig config = new AmazonDynamoDBConfig(); Note: The details of this step will vary for each use case |
| 3. "Build" the Microservice | • See Microservices Manager for more info |
| 4. "Start" the Microservice | • See Microservices Manager for more info |
| 5. Run the Unity scene | • Enjoy! |
With each newly created Microservice, there is auto-generated code. This serves as a working template for the game maker, who will write the actual implementation.
Example
Beamable SDK Examples
• The following example code is available for download at GitHub.com/Beamable_Microservices_Examples
Project Window
The MyADBMicroserviceExample folder contains the DLL files, Scene, and Scripts for the complete example.

Code
In this MyADBMicroserviceExample.cs example, the MyADBMicroservice.cs allows read/write access to the database.
using UnityEngine;
using Beamable.Server.Clients;

namespace Beamable.Examples.Features.Microservices.MyADBMicroserviceExample
{
    /// <summary>
    /// Demonstrates <see cref="Microservices"/>.
    /// </summary>
    public class MyADBMicroserviceExample : MonoBehaviour
    {
        //  Properties  -----------------------------------

        //  Fields  ---------------------------------------
        private MyADBMicroserviceClient  _myAdbMicroserviceClient;

        //  Unity Methods  --------------------------------

        protected void Start()
        {
            Debug.Log("Start() Instructions...\n" +
            "* Complete docker setup per https://docs.beamable.com/docs/microservices-feature\n" +
            "* Start the server per https://docs.beamable.com/docs/microservices-feature\n" +
            "* Play This Scene\n" +
            "* Enjoy!\n\n\n");

            SetupBeamable();
        }

        //  Methods  --------------------------------------
        private async void SetupBeamable()
        {
            var beamContext = BeamContext.Default;
            await beamContext.OnReady;

            Debug.Log($"beamContext.PlayerId = {beamContext.PlayerId}");

            _myAdbMicroserviceClient = new MyADBMicroserviceClient();

            // #1 - Call Microservice
            bool isSuccess = await _myAdbMicroserviceClient.ConnectToDatabase();

            // #2 - IsSuccess = true
            Debug.Log ($"ConnectToDatabase() IsSuccess = {isSuccess}");
        }
    }
}
using System;
using System.Threading.Tasks;
using Amazon;
using Amazon.DynamoDBv2;
using Amazon.Runtime;
using UnityEngine;

namespace Beamable.Server.MyADBMicroservice.MyADBMicroserviceExample
{
   [Microservice("MyADBMicroservice")]
   public class MyADBMicroservice : Microservice
   {
      [ClientCallable]
      public async Task<bool> ConnectToDatabase()
      {
         // TODO: Create an account with https://aws.amazon.com/dynamodb/
         // TODO: And add your keys here
         string accessKey = "replace-with-your-access-key";
         string secretKey = "replace-with-your-secret-key";

         try
         {
            // Credentials
            var credentials = new BasicAWSCredentials(accessKey, secretKey);

            // Configuration
            var config = new AmazonDynamoDBConfig()
            {
               RegionEndpoint = RegionEndpoint.USWest2
            };

            // Client
            AmazonDynamoDBClient client =
               new AmazonDynamoDBClient(credentials, config);

            Debug.Log($"CallADB() Success!");

         }
         catch (Exception e)
         {
            Debug.Log($"CallADB() Failure! Message = {e.Message}");
            return false;
         }

         return true;
      }
   }
}
Gotchas
Here are hints to help explain some of the trickier concepts:
• The
MyADBMicroserviceExample.cswill compile and run as shown above. However,
• The game maker must create an account with https://aws.amazon.com/dynamodb/ and update the C# code to use those credentials to properly connect with Amazon DynamoDB
Newtonsoft.JSON
Newtonsoft.JSON is a popular tool for handling JSON in dotnet. The internals of the Beamable Microservice already use Newtonsoft, but the type information is not available in Unity by default. However, as of 1.3.1, a custom Newtonsoft.Json dll file may be referenced and used within the Microservice code. When a custom Newtonsoft.Json is provided, it will override the existing source Beamable uses.
An easy to obtain a custom version of Newtonsoft.JSON is to reference Unity's standard UPM newtonsoft Package. Add this line to your manifest.json dependencies section.
"com.unity.nuget.newtonsoft-json": "3.2.1",
Then, in your Microservice's assembly definition file, add a reference to the now available dll.
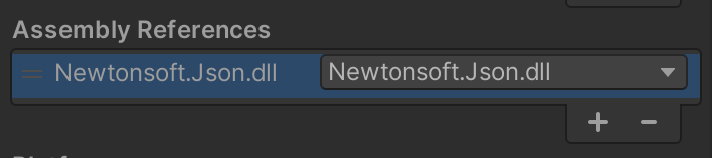
Now you can take advantage of Newtonsoft in your Microservice.
Unity style serialization is still used for wire protocols!
Even if you have configured Newtonsoft in your Microservice, the inputs and outputs of
[ClientCallable]methods will still use Unity style serialization. Therefor, you cannot use newtonsoft serialization techniques for inputs and outputs.
Updated 9 months ago