Google Sign-In - Guide
Install and configure the Google Sign-In SDK [IDEN-Google-02]
Prerequisites
This guide assumes the following prerequisites have been completed:
| Steps | Details |
|---|---|
| 1. Unity: Set up the Beamable SDK for Unity | • See Beamable's Getting Started for more info |
| 2. Unity: Switch platform to Android | • Unity → File → Build Settings • Select Android then press Switch Platform |
| 3. Unity: Establish Keystore for Signing | • Unity → File → Build Settings • Press Player Settings... • In Inspector, go to Publishing Settings and create the keystore (or unlock an existing one). |
| 4. Android: Set up the corresponding Google Cloud Platform application with OAuth 2.0 credentials | • See Google's start-integrating#configure_a_project for more info Note: You will need both Web application credentials AND platform specific credentials for Android or iOS or both. |
Configure Unity Project
Follow these steps to get started:
| Step | Detail |
|---|---|
| 1. Retrieve the Client Id | • Go to https://console.cloud.google.com/apis/credentials • Copy the "Web application" client ID |
| 2. Open Configuration Manager |  • Unity → Window → Beamable → Open Toolbox • Click the "Config" Button |
| 3. Edit "Account Management" Configuration | 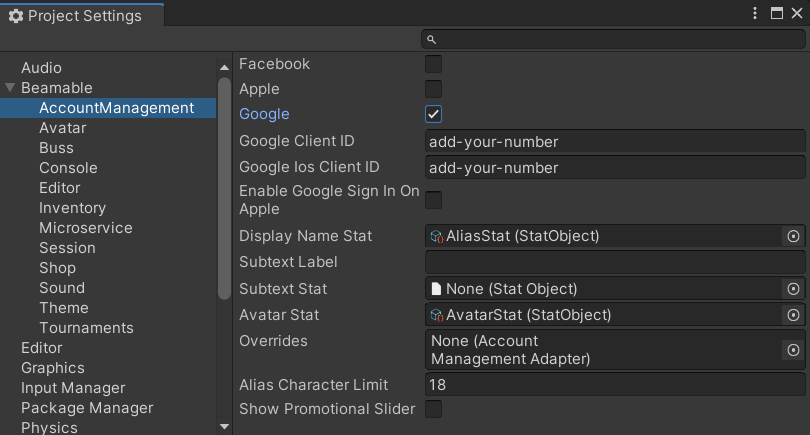 • Set "Google" to true • Set "Google Client Id" to Client Id from Step 1 • (Optional) Set "Google iOS Client Id" to Client Id from Step 1 |
| 4. Edit gradle file. | • Open the .gradle file located in your project at Plugins/Android/mainTemplate.gradle • Look for the dependencies block and add play-services-auth.See the code sample below for how the block should look after adding the dependency. |
dependencies {
    implementation fileTree(dir: 'libs', include: ['*.jar'])
    implementation 'com.google.android.gms:play-services-auth:18.1.0'
**DEPS**
}
Additional iOS Setup
When using Google Sign-In on Apple, the Login Flow depends on version 5 of Google's Sign-In SDK framework for iOS. Enabling sign-in on iOS also requires first-time setup regarding a custom URL scheme specific to your Google Cloud App, including overriding the openURL method on UnityAppController.
| Step | Detail |
|---|---|
| 1. Install the Google Sign-In SDK | • Download Google Sign-In SDK version 5.0.0 or newer from https://developers.google.com/identity/sign-in/ios/sdk • Create the Assets/Plugins/iOS folder in your Unity project if it does not already exist• Extract the SDK archive, then copy GoogleSignIn.framework and GoogleSignInDependencies.framework to your Assets/Plugins/iOS folder (note that Beamable does not need GoogleSignIn.bundle as we source icon images independently) |
| 2. Add the URL scheme to your project | • As described in the link from Step 1, your custom URL scheme is a reversed version of your iOS Client ID: com.googleusercontent.apps.<your-app-id>• Unity -> File -> Build Settings -> Player Settings... -> Other Settings • Supported URL schemes: set size to 1 and enter your reversed ID as Element 0 |
3. Ensure that your app delegate (UnityAppController in most cases) handles the openURL method | • The app delegate for your app should handle application:openURL:options: and invoke the handleURL method of GIDSignIn.• See below for an example of how to use "method swizzling" to override the openURL method. |
Method Swizzling for iOS URL Handling

The "Supported URL Schemes" in the Unity Inspector Window
The response from the Google Sign-In flow on Apple uses the custom Supported URL Scheme we set up in the steps above. This requires that the app delegate (namely UnityAppController) implement the openURL method. In order to modify that method, we can use a technique called swizzling, wherein we define a new method with a different selector path and then use method_exchangeImplementations to swap one method for the other.
The code below swizzles the openURL method by adding a category named GoogleSignInAppController onto UnityAppController. When the class has been loaded, the swizzling in the load method will exchange the implementations. Note that in the implementation, we still call the old openURL in case any other handler had been similarly attached.
To use this code as-is, place both GoogleSignInAppController.h and GoogleSignInAppController.mm somewhere within a Plugins/iOS folder in your Unity project.
#import <GoogleSignIn/GIDSignIn.h>
#import <UnityAppController.h>

@interface UnityAppController (GoogleSignInAppController)

- (BOOL)application:(UIApplication *)application
            openURL:(NSURL *)url
            options:(NSDictionary<NSString *, id> *)options;

@end
#import "GoogleSignInAppController.h"
#import <objc/runtime.h>

@implementation UnityAppController (GoogleSignInController)

+ (void)load {
  method_exchangeImplementations(
    class_getInstanceMethod(
      self,
      @selector(application:openURL:options:)),
    class_getInstanceMethod(
      self,
      @selector(GoogleSignInAppController:openURL:options:))
  );
}

- (BOOL)GoogleSignInAppController:(UIApplication *)app
                          openURL:(NSURL *)url
                          options:(NSDictionary *)options {
  BOOL handled = [self GoogleSignInAppController:application
                                         openURL:url
                                         options:options];

  return [[GIDSignIn sharedInstance] handleURL:url] || handled;
}

@end
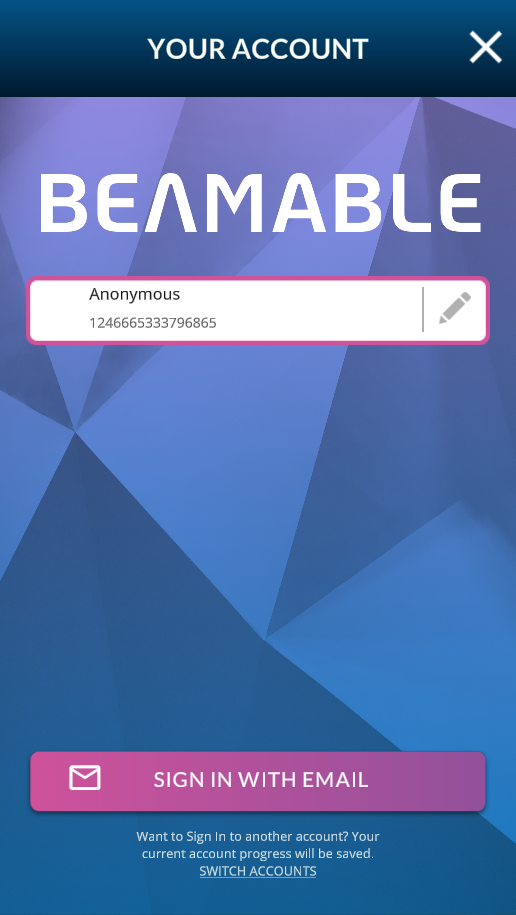
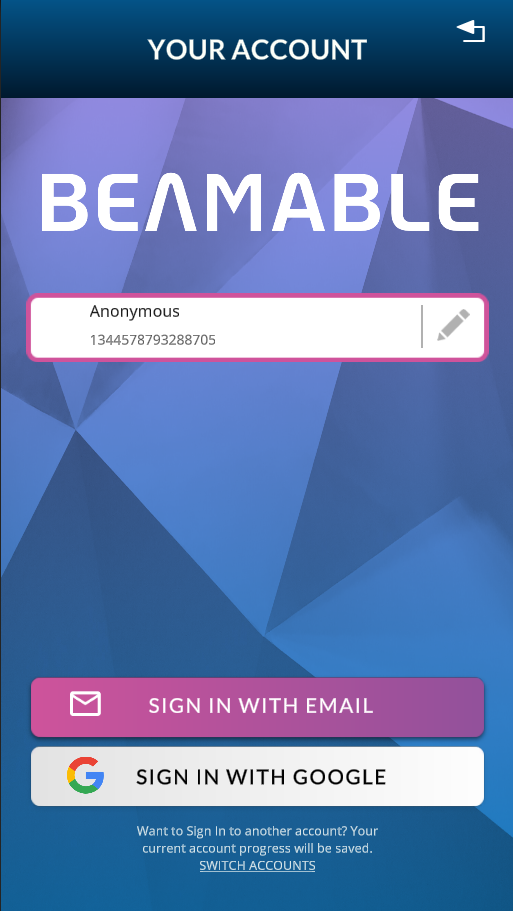
User Interface
When set up properly, the player's user interface in the game project will be as follows:
| Account Management Flow (Default) | Account Management Flow (Google Sign-In) |
|---|---|
 |  |
Next Steps
From here, the player can edit account details including account name and account avatar.
The player can switch accounts and sign in with various methods. See the Accounts feature page for more info.
When finished, the player can close the Account Management Flow window and return to the game-specific content.
Updated about 1 year ago